You have photos. You have a printer. Here’s how ImagePrint bridges the gap — and why it’s worth adding to your workflow.
Most people have never used dedicated photo printing software. Instead, they print straight from their phone gallery or Windows Photos, cross their fingers, and deal with whatever comes out. ImagePrint is what changes that.
It’s a Windows desktop app built specifically for printing photos — not documents, not spreadsheets, just photos. That narrow focus means it handles everything from a simple 4×6 print to a passport photo sheet to a poster spanning six pages, all through the same straightforward interface. In short, it gives you control you simply don’t get anywhere else.
This guide is for anyone opening ImagePrint for the first time. To that end, we’ll walk through what the app is, the four things it does especially well, and a checklist for getting your first print right.
Who is ImagePrint actually for?
ImagePrint sits in a sweet spot between “just hit print” and full professional pre-press software. You don’t need design experience to use it. Even so, it gives you enough control that experienced photographers and designers will also find it genuinely useful.
- Photo enthusiasts – Print collages, birthday cards, and family photo grids without fuss
- ID & passport photos – Skip the photo booth — print compliant photos at home for a fraction of the cost
- Poster printing – Tile one large image across multiple A4 or Letter sheets and tape them together
- Business cards & labels – Use guides and repeat layouts to align prints precisely on specialty paper
The one concept to understand before you start
ImagePrint works differently from printing a photo directly from Windows. When you print from a viewer, the application stretches or shrinks your image to fit the paper and you have almost no say in the matter. ImagePrint, by contrast, gives you a canvas — a digital representation of your physical paper — and you arrange photos on that canvas before sending anything to the printer.
As a result, the canvas and the paper must always be the same size. Set this up in ![]() Page Setup (Ctrl+Shift+P) before you do anything else. It’s the single most important step in the whole workflow and, consequently, the most common source of frustration when it gets skipped.
Page Setup (Ctrl+Shift+P) before you do anything else. It’s the single most important step in the whole workflow and, consequently, the most common source of frustration when it gets skipped.
Note: The default page size is A4 in most regions, and Letter in the US and Canada. If you’ve recently changed your system settings or are printing on unusual paper, double-check this before placing any photos on the canvas.
Your first print: a step-by-step walkthrough
Now that you understand the canvas model, let’s get something out of the printer. This walkthrough covers a basic grid of photos — the most common starting point for new users.

Match your page to your paper
First, open ![]() Page Setup and confirm the page size matches the paper in your printer. Set margins to 0.5 in as a safe default, or zero if your printer supports borderless printing.
Page Setup and confirm the page size matches the paper in your printer. Set margins to 0.5 in as a safe default, or zero if your printer supports borderless printing.
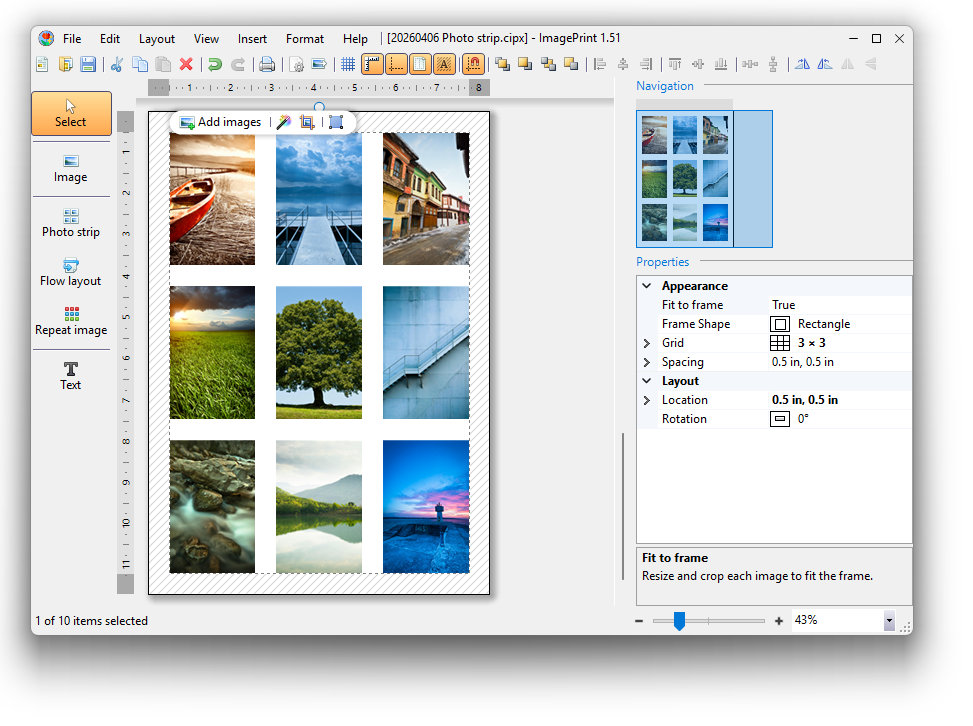
Add a Photo Strip container
Next, click the ![]() Photo Strip button in the left toolbox. Drag the container to the upper-left corner of the page — it will snap to the margin automatically.
Photo Strip button in the left toolbox. Drag the container to the upper-left corner of the page — it will snap to the margin automatically.
Drop in your photos
From there, click ![]() Add images on the toolbar above the container. Alternatively, drag a folder straight from Windows File Explorer — ImagePrint scans all subfolders and loads every image it finds.
Add images on the toolbar above the container. Alternatively, drag a folder straight from Windows File Explorer — ImagePrint scans all subfolders and loads every image it finds.
Adjust the grid
Once your photos are loaded, open the Properties panel on the right and change the row and column count. The photos resize automatically to fit — a 2×3 grid on A4, for example, gives you six prints per page.
Run Auto Correct and print
Finally, select the ![]() Photo Strip and click Auto Correct to apply one-click color improvements to all photos at once. Then press Ctrl+P, confirm your paper size in the Print dialog, and you’re done.
Photo Strip and click Auto Correct to apply one-click color improvements to all photos at once. Then press Ctrl+P, confirm your paper size in the Print dialog, and you’re done.
Four scenarios where ImagePrint shines
Printing a photo grid or collage
The Photo Strip container handles this automatically. You set the grid — say, 3 columns × 4 rows — and the app calculates the size of every photo based on the page dimensions and spacing you’ve chosen. Beyond that, photos can be reordered by dragging them within the container, and individual frame shapes can be changed to ovals, hearts, or diamonds for a more creative result.
If you need exact photo dimensions rather than auto-calculated sizes, use the Flow Layout container instead. It works in the same way, but lets you specify each photo’s size yourself — particularly useful when you need standard print sizes like 4×6 or 5×7 within a mixed layout.
Making a large poster from one image
High-resolution photos can be stretched across multiple pages to create prints far larger than your printer can handle in one go. To begin, add your image and click Resize on the image toolbar. Choose a target paper size with “Exclude Page Margins” checked, then drag the image’s corner handle outward. New pages are added automatically. Finally, print all pages and tape them together — the margins are designed so the seams line up cleanly.
Printing passport and ID photos
This is where ImagePrint most clearly separates itself from general-purpose tools. The Repeat Image container duplicates a portrait photo across a grid, while the built-in Resize dialog includes an ID/Passport tab with sizes for over 400 document types worldwide. Simply select your country and document type, apply a 3 mm bleed and trim marks, and the app handles the rest.
Common passport photo sizes in ImagePrint
- United States — Passport & Visa: 2 × 2 in (51 × 51 mm)
- European Union — Schengen Visa: 35 × 45 mm
- United Kingdom — Passport: 35 × 45 mm
- Canada — Passport & Citizenship: 50 × 70 mm
- China — Passport & Visa: 33 × 48 mm
- India — Passport & Visa: 2 × 2 in (51 × 51 mm)
Business cards and specialty layouts
ImagePrint includes a Guides system — horizontal and vertical reference lines you can place anywhere on the page — designed for aligning content on pre-scored business card paper or label sheets. Once you’ve set guides to match the card boundaries and locked them in place, your images snap to them precisely. This is more reliable than eyeballing it and considerably faster than measuring by hand.
Before your first print: a quick checklist
Even experienced users benefit from running through this list before printing. Most print failures trace back to one of these six points.
- Page size in ImagePrint matches the paper in your printer
- Auto Size is enabled in Page Setup so extra pages are added automatically
- Photos sit inside the white canvas area, not on the hatched margin zone
- Paper type is set correctly in the Print dialog
- Scale is set to 100% in the Print dialog
- Test print done on plain paper before using photo paper
Saving and sharing your work
ImagePrint saves layouts as .cipx files — a format that bundles your photos, text, layout, and print settings into one document. As a result, the next time you open the file, everything is exactly as you left it, including your print configuration.
You can upload .cipx files to OneDrive or Google Drive to access them from another machine. Meanwhile, if you’d rather share the finished output than the editable layout, use Export (Ctrl+E) to generate a PDF. For printing purposes, export at 300 DPI. For sharing by email or displaying on screen, however, 72–150 DPI keeps the file size manageable without any visible quality loss.
Happy printing!