Whether you are framing a special memory or creating a custom gift, printing a specific size like 10 by 14 inches can sometimes feel like a challenge. Standard home printers often default to A4 or Letter sizes, but with the right tools, you can achieve professional results at home.
In this guide, we will walk you through how to use ImagePrint to perfectly size, crop, and print your photos. We will explore how to manage dimensions accurately and ensure your final print looks exactly as it does on your screen.
Setting the Foundation: Page Setup
Before you even touch your photo, you must prepare your digital “canvas.” In ImagePrint, the golden rule is that your screen’s page size must match your physical printer paper.
Choose Your Paper Size
To start, open the ![]() Page Setup dialog (found under the Layout menu or by pressing
Page Setup dialog (found under the Layout menu or by pressing Ctrl+Shift+P).
- For 10×14 Prints: If you are printing on a larger sheet (like 11×17 Tabloid) to trim later, select that as your Paper Size.
- Custom Dimensions: If you have specialized 10×14 inch paper, scroll to the bottom of the Page Size dropdown and select [Custom size]. You can then manually enter “10 in” for the width and “14 in” for the height.

Mind the Margins
Most printers cannot print to the very edge of the paper unless they specifically support “borderless printing”.
- Standard Margins: Setting a 0.5-inch margin is a safe bet for most home printers to avoid clipping your image.
- Visual Check: Use the Live Preview Panel in the Page Setup window. The solid outer line is your paper edge, and the dotted inner line shows your printable area.
Resizing and Cropping Your Photo to 10×14
Once your page is ready, it’s time to bring in your image. You can add a photo by double-clicking the page or dragging and dropping a file directly into the application.

Using the Image Size Dialog
To get an exact 10×14 size, don’t just rely on dragging the corner handles. Instead:
- Select your image and click the
 Resize button on the context toolbar.
 - In the Image Size dialog, enter your custom dimensions: 10 inches by 14 inches.

Real-World Tip: Resolution Matters
For a print this large, resolution is key. ImagePrint defaults to 300 DPI (Dots Per Inch), which is the industry standard for high-quality professional printing. Ensure your original file has enough pixels; at 300 DPI, a 10×14 print requires an image that is at least 3000 x 4200 pixels for maximum clarity.
Pro Features for Perfect Results
ImagePrint offers advanced layout tools that go beyond simple resizing.
Flow Layout for Precision
If you want to print a 10×14 photo alongside other smaller images, use the ![]() Flow Layout container. Unlike the standard
Flow Layout container. Unlike the standard ![]() Photo Strip, the Flow Layout gives you exact control over the photo size while automatically arranging multiple images in a grid.
Photo Strip, the Flow Layout gives you exact control over the photo size while automatically arranging multiple images in a grid.
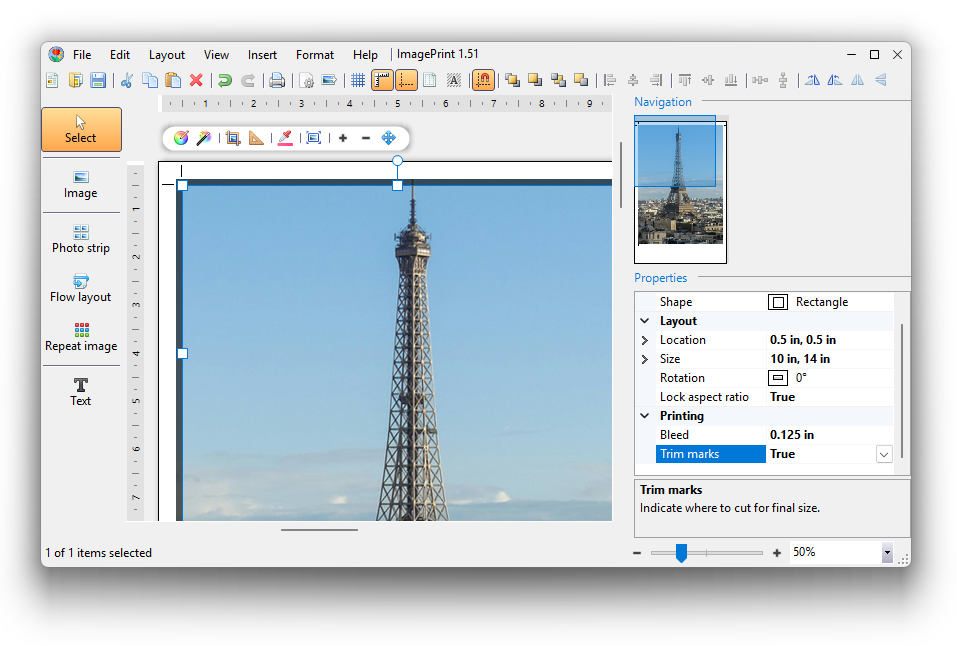
Adding Trim Marks
If you are printing a 10×14 photo on a larger sheet of paper, enable Trim Marks in the Properties panel. These are small “cut here” indicators that show you exactly where to trim the paper to reach your intended 10×14 dimensions.

Final Steps: The Print Dialog
When you’re ready, press Ctrl+P to open the ![]() Print Dialog.
Print Dialog.
- Orientation: Make sure this matches your layout (Portrait for a vertical 10×14 or Landscape for a horizontal one).
- Scale: This should always be set to 100% for final prints.
- Troubleshooting: If your colors look off or elements are missing, try checking the “Print as Image” box. This merges all layers into a single bitmap, which often fixes incompatible printer driver issues.
Printing a 10 by 14 photo doesn’t have to be a guessing game. By setting your page dimensions correctly, using the ![]() Resize dialog for precision, and utilizing tools like trim marks, you can create gallery-quality prints from your own desk. Whether it’s a family portrait or a scenic landscape, ImagePrint ensures your memories are captured exactly how you envisioned them.
Resize dialog for precision, and utilizing tools like trim marks, you can create gallery-quality prints from your own desk. Whether it’s a family portrait or a scenic landscape, ImagePrint ensures your memories are captured exactly how you envisioned them.