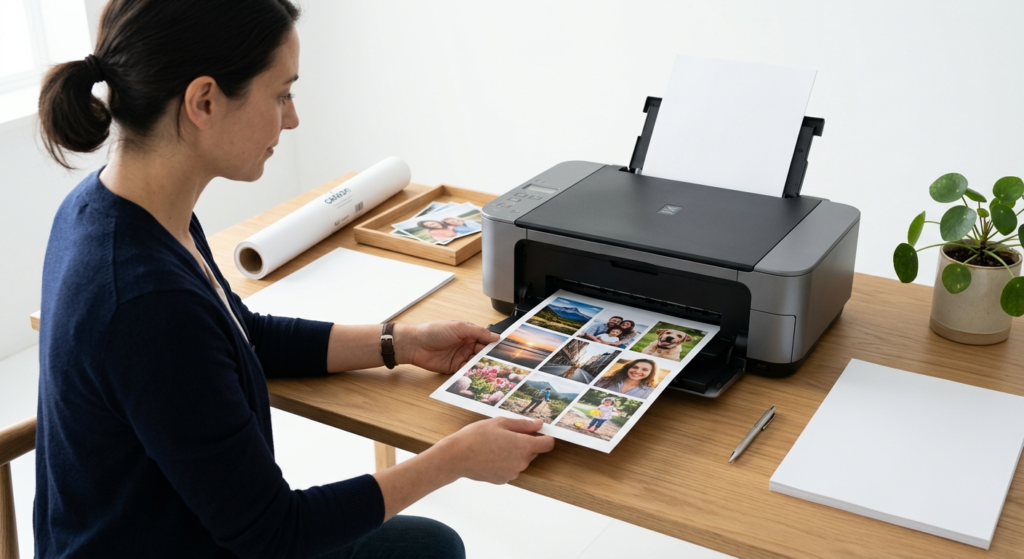
Print perfect photos at home
How to Print Multiple Photos on One Page
Create perfect photo layouts in minutes—save paper, reduce ink, and print like a pro
Do you want to print multiple photos on one page and save both ink and paper?
Whether you are printing family portraits, collages, passport photos, or event snapshots, ImagePrint makes it fast and easy to print many photos on a single sheet of paper. This step-by-step beginner tutorial walks you through every feature you need to print multiple photos on one page — from the first click to the final printout. By the end of this guide, you will know exactly how to arrange, adjust, and print your photos like a pro.
- What Is ImagePrint and Why Use It to Print Multiple Photos on One Page?
- Understanding the ImagePrint Interface Before You Start
- Step 1 — Set Up Your Page Correctly
- Step 2 — Use the Photo Strip to Print Multiple Photos on One Page in a Grid
- Step 3 — Use the Flow Layout for Precise Photo Sizes
- Step 4 — Adjust Photo Colors Before Printing
- Step 5 — Crop, Straighten, and Zoom Your Photos
- Step 6 — Configure the Print Dialog to Print Multiple Photos on One Page
- Step 7 — Export to PDF Instead of Printing
- Advanced Technique: Use Guides to Align Photos Precisely
- Tips and Tricks for Better Results When You Print Multiple Photos on One Page
- Frequently Asked Questions About Printing Multiple Photos on One Page
- Conclusion
What Is ImagePrint and Why Use It to Print Multiple Photos on One Page?
ImagePrint is a powerful application designed specifically for home photo printing. It supports virtually every image format — including JPG, PNG, BMP, HEIC, AVIF, RAW, PDF, and SVG — meaning you can drag in photos straight from your camera card, phone backup, or computer without any conversion. Crucially, ImagePrint gives you three dedicated container shapes — the ![]() Photo Strip, the
Photo Strip, the ![]() Flow Layout, and the
Flow Layout, and the ![]() Repeat Image — that make it easy to print multiple photos on one page in a clean, professional grid. Instead of manually resizing and aligning each photo in a word processor, ImagePrint handles all the calculations automatically so that every photo fits perfectly on the paper.
Repeat Image — that make it easy to print multiple photos on one page in a clean, professional grid. Instead of manually resizing and aligning each photo in a word processor, ImagePrint handles all the calculations automatically so that every photo fits perfectly on the paper.
Furthermore, ImagePrint works with inches and centimetres rather than pixels. This approach matters because your computer screen runs at roughly 96 DPI while most home printers run at 300 to 600 DPI. If a program works in pixels, your printed photos will look a different size to what you see on screen. ImagePrint eliminates that mismatch entirely. Consequently, the page you design on screen will be exactly the same size when it comes out of the printer.
Understanding the ImagePrint Interface Before You Start
Before you print multiple photos on one page, it helps to know where the key controls live. ImagePrint organises its interface into five main areas:
- Top Toolbar — contains New, Open, Save, Print, Page Setup, Export, and view controls such as Show Grid, Show Ruler, and Snap to Objects.
- Menu Bar — provides access to less-used features including Guides, Insert shapes, Format, and Help.
- Left Toolbox — lists all shape types: Select, Photo Strip, Flow Layout, Repeat Image, and Text.
- Canvas — the white page area where you build your layout.
- Right Panels — the Navigation panel (a live mini-map of your whole document) and the Properties panel (settings for the selected shape).
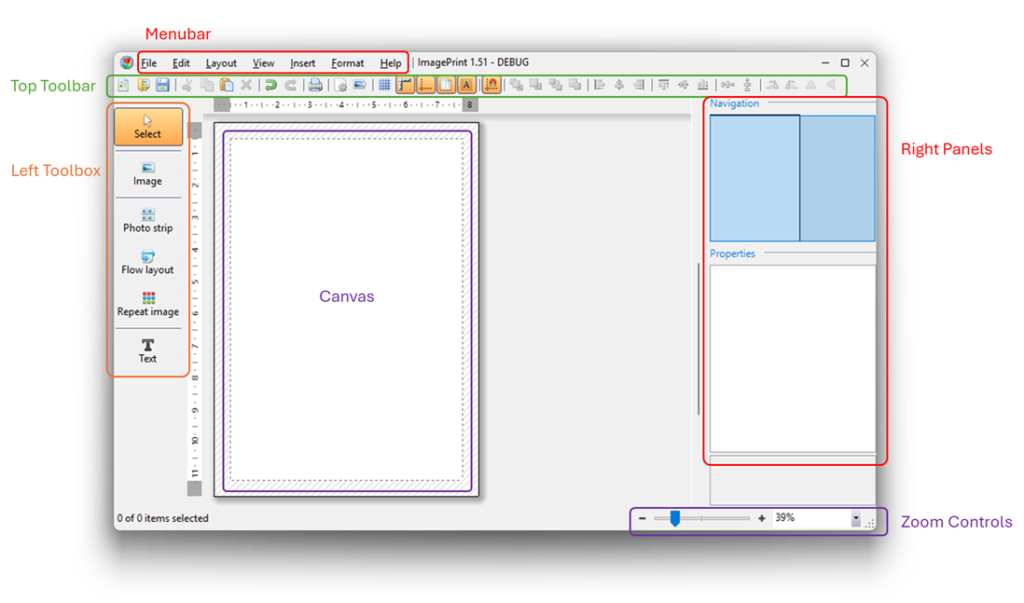
The Status Bar at the bottom shows the number of selected shapes, progress for ongoing operations, and the zoom controls. You can zoom in and out with Ctrl++ and Ctrl+−, or hold Ctrl and use the mouse wheel to zoom precisely to any point on the canvas. Understanding these areas first will make every step in this tutorial much faster.
Step 1 — Set Up Your Page Correctly
The single most important rule when you want to print multiple photos on one page is this: the page size inside ImagePrint must always match the physical paper size loaded in your printer. If these two sizes differ, your printed photos will be scaled incorrectly, cut off, or surrounded by unexpected white borders. Therefore, always configure the Page Setup dialog first, before you add a single photo.
How to Open Page Setup
Open Page Setup by clicking the ![]() Page Setup button on the top toolbar, by going to File >
Page Setup button on the top toolbar, by going to File > ![]() Page Setup…, by going to Layout >
Page Setup…, by going to Layout > ![]() Page Setup…, or by pressing the keyboard shortcut Ctrl+Shift+P. The Page Setup dialog is divided into four sections: Margins, Layout, Page Size, and Convert.
Page Setup…, or by pressing the keyboard shortcut Ctrl+Shift+P. The Page Setup dialog is divided into four sections: Margins, Layout, Page Size, and Convert.
Configuring Margins
Margins define the white safety zone between the edge of the paper and your printed content. Most desktop printers cannot print right to the edge of the paper, so a margin of 0.5 inches (approximately 12 mm) is a safe default for general home printing. If your printer supports borderless printing, you can set all margins to zero. However, keep in mind that even borderless printers may apply a tiny physical margin. Setting your margins correctly now prevents photos from being clipped during printing.
Tip: Enable ![]() Show Page Margins on the top toolbar so that the margins appear as dotted lines on the canvas. This visual guide makes it easy to confirm that all your photos sit inside the printable area.
Show Page Margins on the top toolbar so that the margins appear as dotted lines on the canvas. This visual guide makes it easy to confirm that all your photos sit inside the printable area.
Choosing Page Size and Orientation
Click the Browse… button in the Page Size section to open a searchable list of more than 150 standard paper sizes. Type your paper name — for example, “A4” or “Letter” — in the filter box and double-click the result to select it. If you are printing on a custom size not in the list, scroll to the bottom of the Page Size dropdown and choose [Custom size], then enter your dimensions manually.
For orientation, select Portrait if your photos are taller than they are wide, and Landscape if you are printing a wide panoramic layout or want more horizontal space for your photo grid. Changing orientation automatically swaps the width and height of the page.
Setting Resolution
The Resolution field in the Convert section controls how ImagePrint converts pixel-based photos into inch-based measurements when you first import them. The default of 300 DPI is ideal for most home photo printing. If you are printing a quick draft, 150 DPI is sufficient and will process faster. For professional photo quality, set 600 DPI. Note that once you have set your page up in inches, the resolution setting no longer affects photos that you manually resize — it only influences the initial import size of newly added photos.
Once you are satisfied with all settings, click OK to close the dialog. You are now ready to start printing multiple photos on one page.
Step 2 — Use the Photo Strip to Print Multiple Photos on One Page in a Grid
The ![]() Photo Strip is the easiest and fastest way to print multiple photos on one page. It arranges any number of photos automatically into a rows-and-columns grid that fills the entire printable area. Because the
Photo Strip is the easiest and fastest way to print multiple photos on one page. It arranges any number of photos automatically into a rows-and-columns grid that fills the entire printable area. Because the ![]() Photo Strip calculates individual photo sizes based on the page size, margins, spacing, and grid layout, you do not need to resize any photo manually.
Photo Strip calculates individual photo sizes based on the page size, margins, spacing, and grid layout, you do not need to resize any photo manually.
Adding the Photo Strip to the Canvas
Click the ![]() Photo Strip button in the left toolbox. A container shape with placeholder preview images appears on the canvas. Drag it to the upper-left corner of the white page area. When the shape snaps to the page margins, red dotted snap lines appear to confirm the correct position. The Photo Strip automatically sizes itself to fill the entire printable area, so there is no need to manually resize it.
Photo Strip button in the left toolbox. A container shape with placeholder preview images appears on the canvas. Drag it to the upper-left corner of the white page area. When the shape snaps to the page margins, red dotted snap lines appear to confirm the correct position. The Photo Strip automatically sizes itself to fill the entire printable area, so there is no need to manually resize it.
Adding Photos to the Photo Strip
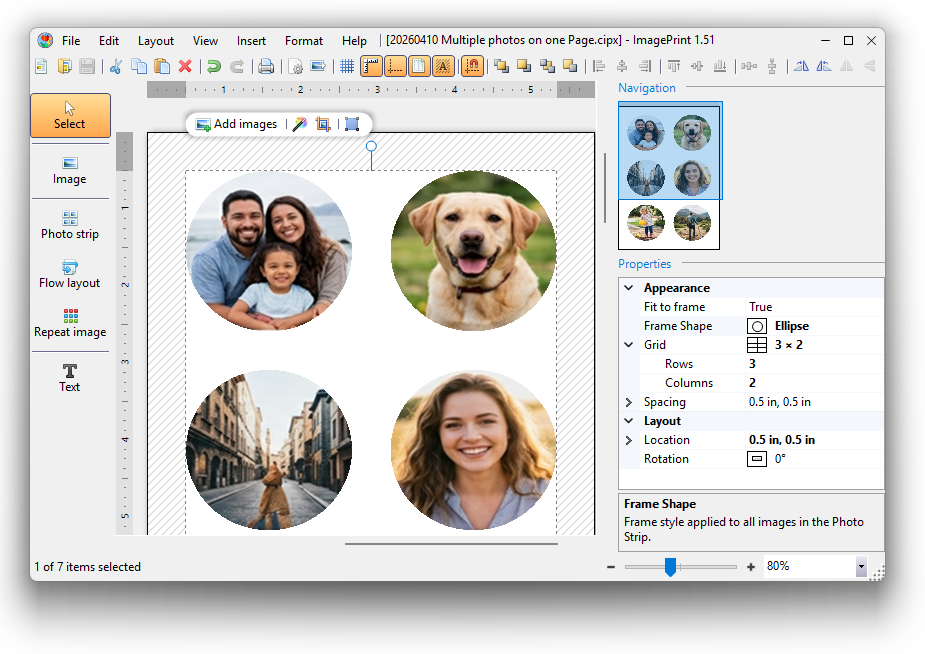
Click the Photo Strip to select it. A context toolbar appears above it with buttons for Add Images, Auto Correct, Crop Images, and Select All Images. Click ![]() Add Images to open the file browser, then select one or multiple photos. Hold Ctrl while clicking to select more than one file at a time.
Add Images to open the file browser, then select one or multiple photos. Hold Ctrl while clicking to select more than one file at a time.
Alternatively, open File Explorer on your computer and drag an entire folder directly onto the Photo Strip. ImagePrint will scan the folder structure and add every image it finds. This is the fastest way to add a large batch of photos.
Tip: When dragging photos into the Photo Strip, hold the Ctrl key on your keyboard. This activates a special highlighted border around the Photo Strip that guarantees every dragged image lands inside the container rather than on the page background.
Configuring the Grid Layout
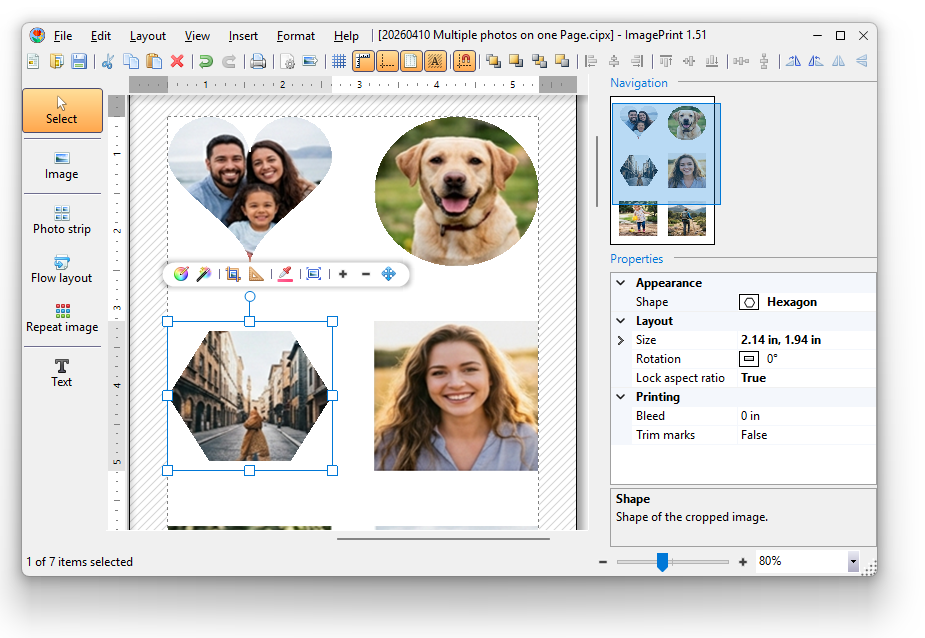
With the Photo Strip selected and no individual photos selected, look at the Properties panel on the right side of the screen. The Grid property controls the number of rows and columns. The default is 2 rows and 2 columns — meaning 4 photos per page. Click the dropdown arrow next to Grid to choose a preset such as 2×3, 3×3, 3×4, or 4×6. Alternatively, click the expand arrow next to the Layout property and type custom values for Rows and Columns.
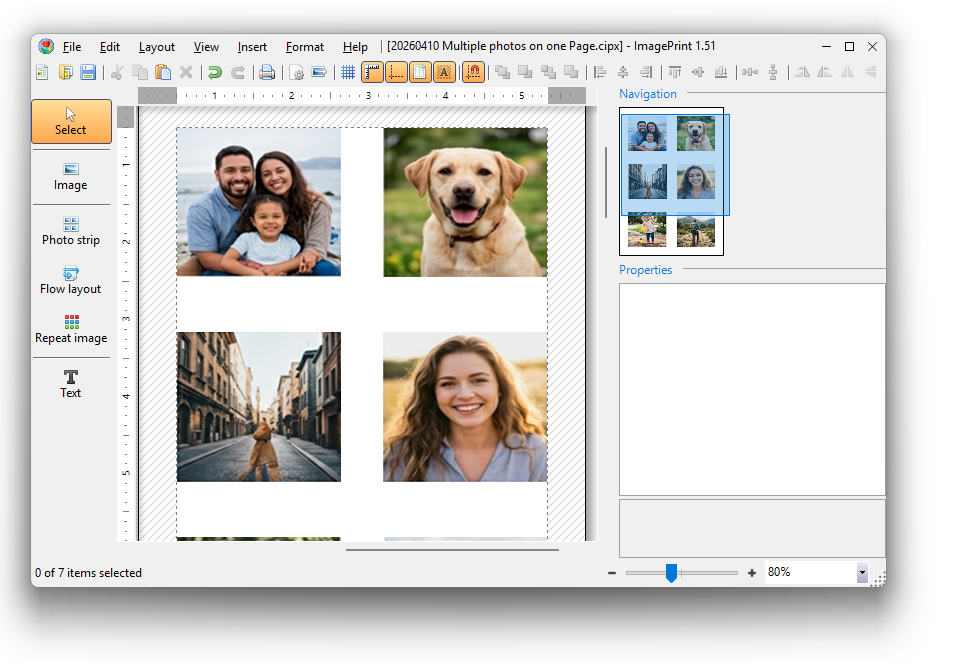
As soon as you change the grid, ImagePrint recalculates the size of every photo so they all fit perfectly within the available space. This makes the Photo Strip the ideal choice whenever you want to print multiple photos on one page quickly without worrying about individual photo dimensions.
Adjusting Spacing and Frame Shape
The Spacing property sets the white gap between photos. A value of 0.1 to 0.2 inches gives a clean look for most layouts. If you want photos to sit flush against each other with no gap at all, set Spacing to zero. The Frame Shape property lets you display photos inside decorative shapes such as ellipses, hearts, or diamonds rather than the standard rectangle — a fun option for birthday cards and invitations.
Rearranging and Replacing Photos
Once your photos are inside the Photo Strip, you can reorder them simply by dragging one photo over another — the two positions swap automatically. To replace a specific photo, right-click it and choose Replace Image. To remove a photo, select it and press the Delete key. Remember that you can press Ctrl+Z to undo any accidental changes.
Step 3 — Use the Flow Layout for Precise Photo Sizes
While the ![]() Photo Strip automatically calculates photo sizes from the grid, the
Photo Strip automatically calculates photo sizes from the grid, the ![]() Flow Layout lets you control the exact size of every photo. This is the right tool when you want to print multiple photos on one page and each photo must measure a specific dimension — for example, a mix of 4×6 inch and 5×7 inch prints on a single sheet.
Flow Layout lets you control the exact size of every photo. This is the right tool when you want to print multiple photos on one page and each photo must measure a specific dimension — for example, a mix of 4×6 inch and 5×7 inch prints on a single sheet.
Adding a Flow Layout
Click the ![]() Flow Layout button in the left toolbox, or go to Insert >
Flow Layout button in the left toolbox, or go to Insert > ![]() Flow Layout in the menu bar. Move the container to the top-left of the page so it snaps to the margins. The Flow Layout arranges photos from left to right and top to bottom. As you add photos, each row fills until there is no more horizontal space, then the next photo moves to a new row.
Flow Layout in the menu bar. Move the container to the top-left of the page so it snaps to the margins. The Flow Layout arranges photos from left to right and top to bottom. As you add photos, each row fills until there is no more horizontal space, then the next photo moves to a new row.
Resizing Photos in the Flow Layout
Click a photo inside the Flow Layout to select it. White drag handles appear around the edges. Drag a corner handle to resize the photo proportionally. Drag a side handle to stretch only the width or height. If you need all photos in the layout to match an exact size, click the ![]() Resize All Images button on the context toolbar of the Flow Layout. The Image Size dialog opens and lets you enter a precise width and height or choose a standard print size such as 4×6 in or 5×7 in.
Resize All Images button on the context toolbar of the Flow Layout. The Image Size dialog opens and lets you enter a precise width and height or choose a standard print size such as 4×6 in or 5×7 in.
Flow Layout Alignment and Page Break Options
The Alignment buttons on the Flow Layout’s context toolbar control how photos sit within each row. Setting horizontal alignment to Stretch makes photos spread evenly across the full page width. Setting vertical alignment to Stretch fills the full page height, but this only works correctly when Page Break is also set to true in the Properties panel. Enabling Page Break ensures that a photo that does not fit on the current page moves entirely to the next page rather than splitting across a page boundary — a critical setting for clean multi-page layouts.
Tip: When using Stretch alignment with the ![]() Flow Layout, set Spacing to zero. Non-zero spacing interacts with the stretch calculation and can produce uneven gaps between photos.
Flow Layout, set Spacing to zero. Non-zero spacing interacts with the stretch calculation and can produce uneven gaps between photos.
Step 4 — Adjust Photo Colors Before Printing
Printing multiple photos on one page means that color differences between photos will be immediately noticeable side by side. Fortunately, ImagePrint includes a powerful Image Corrections dialog so you can adjust each photo individually — or correct all of them in one click — without touching the original files on your hard drive.
Auto Correct — The Fast Way
The fastest way to improve your photos is to select the Photo Strip or Flow Layout container (not individual photos) and click the ![]() Auto Correct button on its context toolbar. ImagePrint analyses every photo inside the container and applies automatic brightness, contrast, and colour adjustments to all of them simultaneously. This single click is often all that beginners need to significantly improve a batch of photos before printing.
Auto Correct button on its context toolbar. ImagePrint analyses every photo inside the container and applies automatic brightness, contrast, and colour adjustments to all of them simultaneously. This single click is often all that beginners need to significantly improve a batch of photos before printing.
Manual Image Corrections
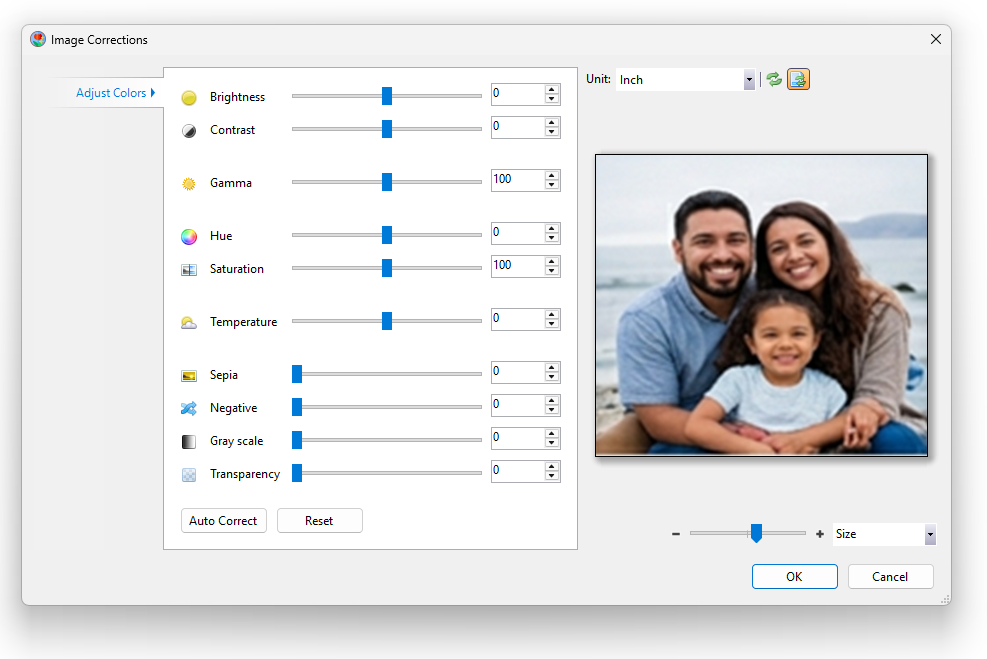
For finer control, click an individual photo and then click the ![]() Image Corrections button on the image’s context toolbar (or simply double-click the photo). The Image Corrections dialog opens with the following sliders:
Image Corrections button on the image’s context toolbar (or simply double-click the photo). The Image Corrections dialog opens with the following sliders:
 Brightness — Makes the overall image lighter or darker. Use small adjustments to avoid washing out highlights or losing shadow detail.
 Contrast — Widens the gap between the darkest and lightest parts of the image. Increasing contrast slightly makes photos look vivid and punchy on paper.
 Gamma — Brightens or darkens the middle tones without affecting pure blacks or whites. This is a gentler alternative to the Brightness slider.
 Saturation — Controls the intensity of colours. Boosting saturation slightly makes colours pop on glossy photo paper.
 Temperature — Shifts the colour toward warm (yellow/orange) or cool (blue). Use it to neutralise the yellow cast of indoor lighting or to warm up outdoor sunset shots.
 Gray Scale — Converts the photo to black and white. Pair this with a slight contrast boost for a classic monochrome look.
A live preview panel on the right side of the dialog updates in real time as you move each slider. Click Reset to undo all changes and start fresh. Click OK to apply the adjustments.
Tip: Always do a test print on plain paper before printing your final layout on glossy photo paper. Colours on screen can look slightly different to colours on paper, so a cheap test print helps you fine-tune corrections before committing to expensive media.
Step 5 — Crop, Straighten, and Zoom Your Photos
When you print multiple photos on one page, badly framed or tilted photos draw the eye immediately. ImagePrint provides several tools on the image context toolbar to fix these issues before printing.
Cropping Photos
Click a photo and then click ![]() Crop Image on the context toolbar. The page dims and the crop editor activates. You see two elements: the inner picture (the full original image) and the crop view rectangle (the area that will be printed). Drag the black handles on the crop rectangle to select the portion you want to keep. You can also move the picture inside the crop rectangle to reposition the subject. The
Crop Image on the context toolbar. The page dims and the crop editor activates. You see two elements: the inner picture (the full original image) and the crop view rectangle (the area that will be printed). Drag the black handles on the crop rectangle to select the portion you want to keep. You can also move the picture inside the crop rectangle to reposition the subject. The ![]() Rule of Thirds overlay helps you follow photography composition rules for more visually balanced crops.
Rule of Thirds overlay helps you follow photography composition rules for more visually balanced crops.
When you are happy with the crop, click Accept or press Enter. To cancel, click Reject. To undo a crop after applying it, press Ctrl+Z or right-click the photo and choose Reset > Reset Crop.
Straightening Tilted Photos
If a photo was taken at a slight angle, click ![]() Straighten Image on the context toolbar. Click and drag from one point to another along a line that should be horizontal — for example, the horizon, a table edge, or a window frame. When you release the mouse, ImagePrint rotates the photo so that line becomes perfectly level. This small correction makes a significant visual difference when photos are displayed side by side on a printed page.
Straighten Image on the context toolbar. Click and drag from one point to another along a line that should be horizontal — for example, the horizon, a table edge, or a window frame. When you release the mouse, ImagePrint rotates the photo so that line becomes perfectly level. This small correction makes a significant visual difference when photos are displayed side by side on a printed page.
Zooming and Panning Inside a Photo
The ![]() Zoom In and
Zoom In and ![]() Zoom Out buttons on the image context toolbar enlarge or reduce the picture inside the image frame by 10% per click, without changing the frame size on the page. This lets you zoom in on a face or key detail without affecting the overall layout. After zooming, use
Zoom Out buttons on the image context toolbar enlarge or reduce the picture inside the image frame by 10% per click, without changing the frame size on the page. This lets you zoom in on a face or key detail without affecting the overall layout. After zooming, use ![]() Move Picture to drag the image content until the most important part of the photo sits in the centre of the frame. Right-click and choose Reset > Reset Crop to restore the original framing.
Move Picture to drag the image content until the most important part of the photo sits in the centre of the frame. Right-click and choose Reset > Reset Crop to restore the original framing.
Step 6 — Configure the Print Dialog to Print Multiple Photos on One Page
You have set up your page, added photos, chosen your grid, and adjusted colours. Now it is time to print. Click the ![]() Print button on the toolbar, go to File >
Print button on the toolbar, go to File > ![]() Print, or press Ctrl+P. The Print dialog opens.
Print, or press Ctrl+P. The Print dialog opens.
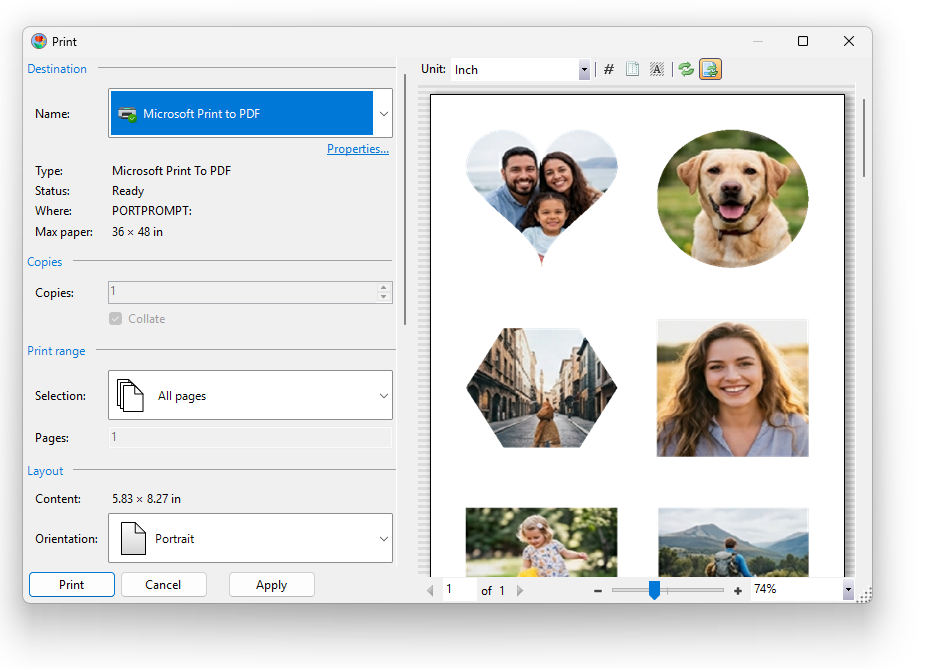
Choosing Your Printer
The Destination section shows all printers installed on your computer. Select your printer from the dropdown. The default printer shows a green checkmark. Check the Status field: it should say Ready. If it says Offline or Error, printing will fail. The Max Paper field tells you the largest paper size the printer supports — useful if you are printing on unusual media.
Tip: Keep your printer drivers up to date. Outdated or corrupted drivers can cause ImagePrint to crash or produce incorrect output. Download the latest driver from your printer manufacturer’s website.
Matching Paper Size
In the Paper section, set the Paper Size to match the paper loaded in your printer’s tray. ImagePrint tries to pre-select the correct paper size automatically, but always verify this before printing. A mismatch between document size and printer paper size is the most common reason for cropped or stretched photo printouts.
Setting Print Quality
The Quality field in the Paper section sets the print resolution in DPI. For high-quality photo printing, use 1200 DPI — this produces sharp detail and smooth colour gradients. Use 300 DPI for quick drafts to save ink. Use 600 DPI for general-purpose printing where some sharpness matters but speed is also important. Note that setting a very high DPI on a low-resolution source photo will not improve print quality — the printer simply works harder without any visible benefit.
Selecting Paper Type
Choose the correct Paper Type — for example, Plain Paper, Glossy Photo Paper, or Matte Photo Paper. Printers adjust their ink volume and drying time based on this setting. Using the wrong paper type causes ink to smear, colours to look faded, or ink pooling on the page. Always match this setting to the media physically loaded in the printer.
Printing Multiple Copies
The Copies field lets you print the same layout multiple times in a single job. If you are printing holiday cards or event photos, increase this number rather than clicking Print repeatedly. The Collate checkbox controls the output order: when Collate is on, the printer produces complete sets of pages in sequence (pages 1-2-3, then 1-2-3 again). When Collate is off, it groups all copies of each page together (page 1 three times, then page 2 three times). For most multi-page photo documents, leave Collate on.
Using the Live Print Preview
The right side of the Print dialog shows a live preview that updates as you change settings. Use the scroll arrows below the preview to browse through all pages. Click ![]() Show Page Numbers on the toolbar above the preview to display page numbers in the corner of each page — this makes it easy to set a custom print range using the Pages field. If the preview is slow to update because you have many pages, uncheck
Show Page Numbers on the toolbar above the preview to display page numbers in the corner of each page — this makes it easy to set a custom print range using the Pages field. If the preview is slow to update because you have many pages, uncheck ![]() Auto-Refresh Preview and click
Auto-Refresh Preview and click ![]() Refresh Preview manually when you are ready.
Refresh Preview manually when you are ready.
Troubleshooting: When to Use Print as Image
If your printed output has missing elements, strange colours, or text that looks incorrect, enable Print as Image in the Output section. This option converts the entire page to a single bitmap before sending it to the printer, bypassing any incompatibilities in the printer driver. The trade-off is slightly reduced sharpness for very large prints at low resolution, but for standard A4 or Letter layouts at 300 DPI, the quality difference is imperceptible.
When all settings are correct, click Print. The job is sent to the printer, and the settings are automatically saved with your ImagePrint document for next time.
Step 7 — Export to PDF Instead of Printing
Sometimes you want to save your multi-photo layout as a PDF file rather than printing it immediately — for example, to share it by email or to send it to a print shop. ImagePrint makes this straightforward. Click the ![]() Export button on the toolbar, go to File >
Export button on the toolbar, go to File > ![]() Export…, or press Ctrl+E. The Save dialog opens. Select Portable Document Format (*.pdf) from the Save As Type dropdown, choose a location and filename, then click Save.
Export…, or press Ctrl+E. The Save dialog opens. Select Portable Document Format (*.pdf) from the Save As Type dropdown, choose a location and filename, then click Save.
The Export to PDF dialog then appears. It mirrors the Print dialog in most respects: you set the page size, orientation, scale, and resolution. For a PDF intended for later printing, use 300 DPI to maintain high quality. For a PDF intended only for screen viewing or emailing, 72 to 150 DPI produces a much smaller file size without any visible reduction in quality on screen. Click Publish to create the PDF.
Advanced Technique: Use Guides to Align Photos Precisely
For users who want even finer control over how photos align on the page, ImagePrint supports Guides — non-printing help lines that snap shapes to exact positions. Guides are particularly useful when printing business cards on pre-scored card sheets, where the card positions must line up precisely with the cut lines on the paper.

To add a guide, drag horizontally from the top ruler to create a horizontal guide, or drag from the left ruler to create a vertical guide. Alternatively, go to Layout > ![]() Guides (Ctrl+G) to open the Guides dialog and type an exact offset value. Each guide can be named, coloured, and locked to prevent it from being accidentally moved while you arrange photos. When a photo is dragged close to a guide, it snaps to the guide position automatically. Hold Alt while dragging to temporarily disable snapping.
Guides (Ctrl+G) to open the Guides dialog and type an exact offset value. Each guide can be named, coloured, and locked to prevent it from being accidentally moved while you arrange photos. When a photo is dragged close to a guide, it snaps to the guide position automatically. Hold Alt while dragging to temporarily disable snapping.
Tips and Tricks for Better Results When You Print Multiple Photos on One Page
Always Test Print on Plain Paper First
Photo paper is expensive. Before printing your final layout on glossy or matte photo paper, print a test copy on plain copy paper at reduced quality (300 DPI). This costs only a fraction of the price and confirms that photo positions, sizes, and colours look as expected. Make any adjustments, then print the final version on photo paper.
Use Snap to Objects for Perfect Alignment
The ![]() Snap to Objects feature on the toolbar automatically aligns moving shapes to nearby shapes, page margins, and page edges. This makes it easy to position a text label precisely below a photo or align an extra standalone image with an existing grid container. If snapping interferes with a fine adjustment, hold Alt while dragging to temporarily suspend it.
Snap to Objects feature on the toolbar automatically aligns moving shapes to nearby shapes, page margins, and page edges. This makes it easy to position a text label precisely below a photo or align an extra standalone image with an existing grid container. If snapping interferes with a fine adjustment, hold Alt while dragging to temporarily suspend it.
Add Text Labels to Your Photo Layouts
Click the ![]() Text button in the left toolbox to add captions, event titles, or date labels to your photo page. The text tool supports all fonts installed on your computer, along with bold, italic, underline, and strikethrough formatting. You can set text alignment to left, centre, or right, and enable word wrap for longer captions. Special fonts are saved with the ImagePrint document so the layout looks correct even when opened on a different computer.
Text button in the left toolbox to add captions, event titles, or date labels to your photo page. The text tool supports all fonts installed on your computer, along with bold, italic, underline, and strikethrough formatting. You can set text alignment to left, centre, or right, and enable word wrap for longer captions. Special fonts are saved with the ImagePrint document so the layout looks correct even when opened on a different computer.
Save Your Document Regularly
ImagePrint saves documents in its own .cipx format, which stores the full layout including all photos, text, adjustments, and print settings. Press Ctrl+S to save or Ctrl+Shift+S to save a copy under a new name. The saved file can be reopened later from the toolbar’s Open button or by dragging the .cipx file onto the ImagePrint canvas. Because print settings are stored in the document, the Print dialog will automatically restore your last settings when you reopen the file.
Use the Best Fit Feature to Save Paper
In the Print dialog, the Best Fit… button below the Paper Size dropdown opens a dialog that ranks all paper sizes and orientations from lowest to highest paper waste. If you are printing a layout that does not perfectly match a standard paper size, Best Fit shows you which paper would give the smallest wasted margin. This feature is especially useful when printing non-standard collages or unusual aspect-ratio photo collections.
Use Keyboard Shortcuts to Work Faster
These keyboard shortcuts significantly speed up your workflow when printing multiple photos on one page:
- Ctrl+P — Open Print dialog
- Ctrl+E — Open Export to PDF dialog
- Ctrl+Shift+P — Open Page Setup
- Ctrl+Z — Undo last action
- Ctrl+D — Duplicate selected shape
- Ctrl+A — Select all shapes
- Ctrl+R — Show/hide ruler
- Ctrl+0 — Zoom to fit all content
- Ctrl+1 — Zoom to 100%
Frequently Asked Questions About Printing Multiple Photos on One Page
How do I print 4 photos on one page?
Add a ![]() Photo Strip to the canvas, then set the Grid property in the Properties panel to 2 Rows and 2 Columns. Add four photos and they will be arranged automatically in a 2×2 grid that fills the printable area. Open the
Photo Strip to the canvas, then set the Grid property in the Properties panel to 2 Rows and 2 Columns. Add four photos and they will be arranged automatically in a 2×2 grid that fills the printable area. Open the ![]() Print dialog, verify the paper size and quality settings, and click Print.
Print dialog, verify the paper size and quality settings, and click Print.
How do I print multiple photos on one page at specific sizes?
Use the ![]() Flow Layout container instead of the Photo Strip. Add your photos, then click
Flow Layout container instead of the Photo Strip. Add your photos, then click ![]() Resize All Images on the Flow Layout’s context toolbar. In the Image Size dialog, enter the exact width and height you need — or choose a standard size from the Standard Print tab. ImagePrint will resize every photo to that dimension and arrange them across the page automatically.
Resize All Images on the Flow Layout’s context toolbar. In the Image Size dialog, enter the exact width and height you need — or choose a standard size from the Standard Print tab. ImagePrint will resize every photo to that dimension and arrange them across the page automatically.
Why do my printed photos look different from the screen?
The most common reason is a mismatch between the ![]() Page Setup size and the printer’s paper size. Verify that both match exactly. A secondary reason is screen-to-print colour shift: screens emit light while paper reflects it, so colours always look slightly different. Use the
Page Setup size and the printer’s paper size. Verify that both match exactly. A secondary reason is screen-to-print colour shift: screens emit light while paper reflects it, so colours always look slightly different. Use the ![]() Image Corrections dialog to fine-tune brightness and colour before printing, and always do a test print on plain paper first.
Image Corrections dialog to fine-tune brightness and colour before printing, and always do a test print on plain paper first.
Can I print photos from my phone on ImagePrint?
Yes. ImagePrint supports all common phone photo formats including JPG, HEIC, AVIF, and PNG. Transfer your photos to your computer first — via a USB cable, Bluetooth, cloud storage such as OneDrive or Google Drive, or by emailing them to yourself. Then drag the photos directly onto the ![]() Photo Strip or
Photo Strip or ![]() Flow Layout container in ImagePrint. For a detailed description on how to print photos on your iPhone, please have a look at How to Print HEIC Photos on Windows.
Flow Layout container in ImagePrint. For a detailed description on how to print photos on your iPhone, please have a look at How to Print HEIC Photos on Windows.
How do I print multiple photos without white borders?
To eliminate white borders between photos, set the Spacing property of the Photo Strip or Flow Layout to zero. To eliminate the white border around the entire page, set all margins to zero in ![]() Page Setup — but this is only possible if your printer supports borderless printing. Check your printer’s manual or specifications to confirm whether borderless printing is available for your paper size.
Page Setup — but this is only possible if your printer supports borderless printing. Check your printer’s manual or specifications to confirm whether borderless printing is available for your paper size.
Conclusion
Whether you are printing a family collage, a sheet of wallet photos, business cards, or event images, ImagePrint’s container shapes makes it easy to print multiple photos on the same page. ImagePrint removes the manual resizing and guesswork that frustrate users in general-purpose programs like Word or PowerPoint. Instead, it gives you precise, professional results directly from your home printer.