How to Print Photos at Home
How to Use the Print Dialog in ImagePrint
Master every print setting to achieve flawless photo results
Printing photos at home sounds simple, but getting a perfect result requires more than just clicking Print. ImagePrint’s Print dialog gives you full control over every aspect of your print job, from choosing the right printer and paper size to adjusting print quality, color mode, and page layout. Understanding each field in the Print dialog helps you avoid wasted ink, cropped photos, and poor-quality results.
This tutorial walks you through every single setting in the ImagePrint Print dialog. Furthermore, it explains what each field does and what happens when you change it. Whether you are printing holiday photos, a large poster, or passport pictures for a visa application, this guide gives you the knowledge you need to get it right the first time.
You can open the Print dialog in three easy ways:
- Click the
 Print button on the main toolbar.
 - Click File > Print on the top menu bar.
- Press the keyboard shortcut Ctrl+P on your keyboard.
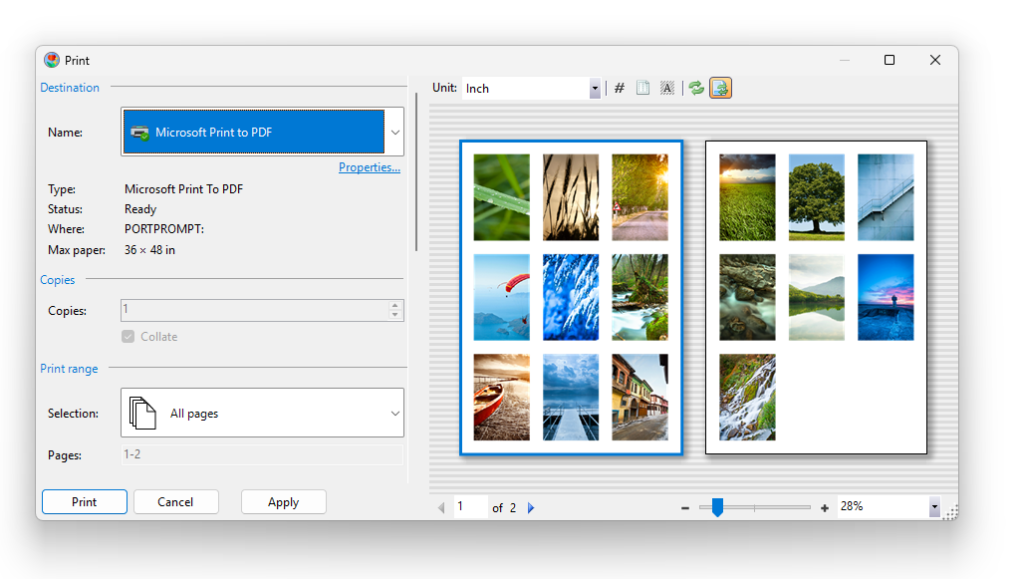
Once the dialog opens, you will see a panel of settings on the left side and a live preview panel on the right side. The dialog organises its settings into six main sections: Destination, Copies, Print Range, Layout, Paper, and Output. Let us go through each section in detail.
Section 1: Destination
The Destination section is the very first thing you see when you open the Print dialog. It tells ImagePrint where to send your print job, in other words, which printer or output device to use.
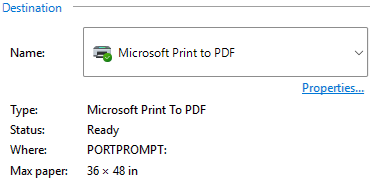
Printer Dropdown
The large dropdown at the top of the Destination section lists all printers currently installed on your Windows PC. This includes printers physically connected by a USB cable, printers connected over your home Wi-Fi network, and virtual printers such as Adobe PDF or Microsoft Print to PDF. If you select a virtual printer, ImagePrint saves your document as a file instead of printing it on paper.
Tip: If you cannot see your printer in the list, make sure it is turned on and connected to the same Wi-Fi network as your computer. Also, always keep your printer drivers up to date. Outdated or corrupted printer drivers can cause ImagePrint to crash or produce unexpected results.
The printer that Windows has set as your default printer displays a small green checkmark next to its name. ImagePrint automatically selects the default printer when you open the dialog, so always double-check that the correct printer appears before you continue.
Properties Button
Directly below the printer dropdown, you will find the Properties… button. Clicking Properties opens your printer’s own advanced settings dialog. This dialog is specific to each printer model and looks different depending on your hardware.
Inside the Properties dialog, you can often control advanced features such as paper trays, stapling (on office printers), built-in colour profiles, and manufacturer-specific ink-saving modes. Most beginners can safely leave these settings at their defaults. However, if your prints look wrong even after configuring all the options in the ImagePrint Print dialog, exploring the Properties dialog is a good next step.
Important: Avoid enabling scaling inside the Properties dialog. Some printer drivers apply their own scaling on top of ImagePrint’s scale setting, which causes your photo to print at an unexpected size. Since ImagePrint already handles scaling, let it do so exclusively.
Status and Maximum Paper Size
Below the Properties button, ImagePrint displays two important information fields.
Status: This field shows the current state of the selected printer. “Ready” means the printer is on and available. “Offline” means the printer is turned off or disconnected. “Busy” means another job is currently printing. Always check the Status field before clicking Print. If the status shows anything other than “Ready”, your print job will most likely fail or wait in a queue.
Max Paper: This field shows the largest paper size that the selected printer supports. This is especially useful for wide-format or plotter printers, where the paper comes on a roll rather than as individual sheets. Checking the maximum paper size prevents you from choosing a paper size the printer physically cannot handle.
Section 2: Copies
The Copies section controls how many prints ImagePrint sends to the printer for each time you click Print.

Copies Field
The Copies number box lets you increase or decrease the number of identical printouts. You can type a number directly, or use the small up and down arrows next to the field. For example, if you are printing holiday greeting cards for ten people, set Copies to 10 and ImagePrint sends ten complete print jobs to your printer in one go.
Important: Always check the Copies field before you click Print. It is easy to accidentally leave this value set to a high number from a previous job, which wastes expensive photo paper and ink.
Collate
The Collate checkbox controls the page order when you print a multi-page document with more than one copy.
When Collate is turned on, the printer produces one complete set of pages before starting the next. For example, if your document has five pages and you print three copies, you receive pages 1-2-3-4-5, then 1-2-3-4-5, then 1-2-3-4-5. This is exactly what you want when printing reports, photo booklets, or any document you distribute as individual complete copies.
When Collate is turned off, the printer groups all copies of each page together first. Using the same example, you receive page 1 three times, then page 2 three times, and so on. This setting is useful when you print forms or stacks of identical pages that someone will sort manually later.
Tip: For photo printing, Collate rarely matters because most photo layouts span only one page. However, if you are printing a multi-page poster, leave Collate on so that pages stay in the correct order automatically.
Section 3: Print Range
The Print Range section controls which pages in your ImagePrint document actually get printed. This is especially useful when you have a large document but only need to reprint one or two specific pages.
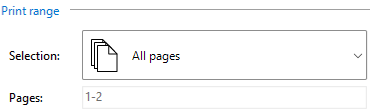
Selection Dropdown
The Selection dropdown offers two main options: All Pages and Custom Range. Selecting All Pages sends your entire document to the printer. Selecting Custom Range activates the Pages field so that you can specify exactly which pages to print.
Pages Field
In the Pages field, you can enter individual page numbers separated by commas, or specify ranges of pages using a dash. For example, entering “1, 3, 5” prints only pages 1, 3, and 5. Entering “2-6” prints pages 2 through 6. You can also combine these formats, for example “1, 3, 5-7, 12” prints pages 1, 3, 5, 6, 7, and 12.
Tip: If your document has many pages and you are not sure which page number contains your photo, click the ![]() Show Page Numbers button on the toolbar above the live preview panel. ImagePrint then displays a small page number in the upper-left corner of each page in the preview, making it easy to identify the correct range.
Show Page Numbers button on the toolbar above the live preview panel. ImagePrint then displays a small page number in the upper-left corner of each page in the preview, making it easy to identify the correct range.
Tip: If changing the print range makes the preview update slowly, turn off the ![]() Auto-refresh Preview button above the preview panel. This stops the preview from regenerating automatically every time you make a change. You can manually refresh the preview by pressing F5 or clicking the
Auto-refresh Preview button above the preview panel. This stops the preview from regenerating automatically every time you make a change. You can manually refresh the preview by pressing F5 or clicking the ![]() Refresh Preview button.
Refresh Preview button.
Section 4: Layout
The Layout section controls how your images appear on the paper. It adjusts the physical orientation, paper size, scale, and mirroring of your document.
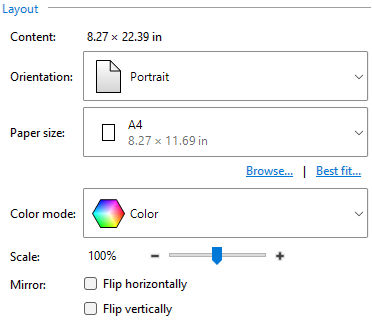
Content Size Label
At the top of the Layout section, ImagePrint displays the total size of the content in your document in a read-only Content label. This value gives you a quick reference for how large your layout actually is before printing. The unit displayed here matches the unit you have selected in the Unit dropdown, which you will find above the live preview panel on the right side of the dialog.
Orientation
![]() Portrait: The paper is taller than it is wide, like a standard letter standing upright. Portrait is the default and suits vertical photos, headshots, and most everyday documents.
Portrait: The paper is taller than it is wide, like a standard letter standing upright. Portrait is the default and suits vertical photos, headshots, and most everyday documents.
![]() Landscape: The paper is wider than it is tall, like a painting hanging on a wall. Landscape suits wide panoramic photos, group photos, and horizontal artwork.
Landscape: The paper is wider than it is tall, like a painting hanging on a wall. Landscape suits wide panoramic photos, group photos, and horizontal artwork.
Changing the orientation swaps the width and height of the paper. Consequently, always make sure that your document’s page orientation specified in ![]() Page Setup matches the orientation you select here. If they differ, your photo may print cropped or with unexpected white space.
Page Setup matches the orientation you select here. If they differ, your photo may print cropped or with unexpected white space.
Paper Size
The Paper Size dropdown lets you select the size of the paper that is loaded in your printer. This setting must match the actual paper sitting in your printer’s paper tray and page size specified in ![]() Page Setup. If the paper size you select here does not match the paper in your printer, your photo will print incorrectly, possibly cropped at the edges, shifted, or with wide white borders on one side.
Page Setup. If the paper size you select here does not match the paper in your printer, your photo will print incorrectly, possibly cropped at the edges, shifted, or with wide white borders on one side.
Standard sizes you will see in the dropdown include A4, Letter, Legal, and a large range of standard photo sizes such as 4×6 in, 5×7 in, and 8×10 in. ImagePrint supports more than 150 paper sizes in total, so whatever paper you use, you will almost certainly find it in the list.
By default, ImagePrint tries to pre-select a paper size that matches your document’s page setup. Nevertheless, always verify the paper size yourself before clicking Print, because a mismatch between the document page size and the printer paper size is one of the most common causes of failed photo prints.
Browse… Button
If the Paper Size dropdown contains too many entries to scroll through conveniently, click the Browse… button. A separate dialog opens where you can type a paper name or dimensions into a filter field to narrow down the list instantly. For example, typing “Letter” shows only the Letter paper size. Typing “4×6” shows only 4×6-inch photo paper. The Browse dialog also shows each paper size’s width, height, and area in separate columns, and you can click any column header to sort the list. This makes it easy to compare sizes at a glance.
Tip: The units displayed in the Browse dialog match the unit you have selected in the Unit dropdown in the Print dialog. Therefore, if you want to compare paper sizes in centimeters, first set the unit to Centimeters in the main Print dialog, then open Browse.
Best Fit… Button
The Best Fit… button, located below the Paper Size dropdown, opens a special dialog that ranks available paper sizes by how efficiently they use paper for your current document. ImagePrint calculates the number of pages needed for each available paper size and orientation, then lists them in ascending order of total paper usage. The option that wastes the least paper appears at the top of the list.
This feature is especially helpful when you want to save paper or reduce printing costs. For example, if your document currently uses six pages on A4 paper, Best Fit might suggest that A3 paper in landscape orientation would print the same content on only three pages.
Scale
The Scale field controls how large or small your content prints relative to its original size. A value of 100% prints your content at exactly the size it appears in the ImagePrint document. Increasing Scale makes the content larger on paper, while decreasing Scale makes it smaller.
You can adjust Scale by typing a value directly, using the slider, or clicking the plus (+) and minus (-) buttons. Note that the preview panel regenerates every time the scale changes, so dragging the slider slowly can feel sluggish on complex documents.
Important: Always set Scale to 100% for final photo prints. If your photos need to be a specific size, resize them directly on the ImagePrint canvas instead of relying on the Scale field here. Using Scale can introduce rounding errors that make photos slightly blurry or misaligned. Additionally, some printer drivers apply their own scaling in the Properties… dialog, which can result in the scale being applied twice.
Tip: Scale is useful for quick test prints. For example, setting Scale to 50% lets you verify the composition and layout of a large poster on a small sheet of plain paper before printing the final version on expensive photo paper.
Mirror (Flip)
The Mirror section contains two checkboxes: Flip Horizontally and Flip Vertically. When you check Flip Horizontally, ImagePrint prints every page as a mirror image, reversing the left and right sides. When you check Flip Vertically, ImagePrint flips every page upside down. Checking both boxes together flips in both directions simultaneously.
Additionally, the Mirror feature reverses the page order. If you have a five-page document and flip it, page 5 prints first and page 1 prints last.
The most common use case for mirroring is iron-on transfers for T-shirts and temporary tattoo transfers. Because these transfers bond to the fabric in reverse, you must print the original image mirrored so that it reads correctly after transfer.
Tip: For regular photo printing, leave both Mirror checkboxes unchecked. If you need to flip individual photos, use the Flip Horizontal or Flip Vertical buttons on the main ImagePrint toolbar instead, so the flip is saved permanently with your document.
Section 5: Paper
The Paper section tells ImagePrint how to interact with your printer’s physical hardware: which paper tray to use, how to handle double-sided printing, the print resolution, and what type of paper is loaded.
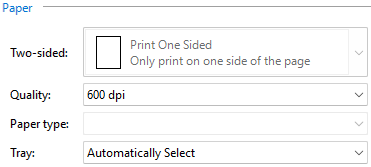
Two-Sided
The Two-Sided dropdown controls whether the printer prints on one side of the paper or both sides. Three options are available.
- Print One Sided: The printer uses only the front of each sheet. This is the default and the best choice for most photo prints, because photo paper is not designed for double-sided printing.
- Print Two Sided (Long Edge): The printer prints on both sides of the paper and flips pages along the long edge, like the pages of a regular book. Use this option for portrait-oriented booklets or multi-page documents where you flip pages left to right.
- Print Two Sided (Short Edge): The printer prints on both sides and flips along the short edge, like a calendar that opens at the top. Use this option for landscape-oriented documents or calendar-style layouts.
Tip: Never use Two-Sided printing with glossy photo paper. Most glossy photo papers are too thin or too coated to run through a printer twice, and the ink from the first pass will smear or damage the second side.
Quality (DPI)
The Quality field sets the print resolution, measured in DPI (Dots Per Inch). DPI determines how many tiny ink dots the printer places within each square inch of the paper. A higher DPI produces sharper, more detailed prints but takes longer and uses more ink.
Here is a practical guide to common DPI values:
- 150 DPI: Suitable for quick draft proofs where you just want to check the composition. The print looks noticeably less sharp and colours appear less vivid. Use this only for test prints on plain paper.
- 300 DPI: The standard for high-quality photo printing. At 300 DPI, most photos look sharp and detailed when viewed at a normal distance. This is the recommended setting for everyday home photo printing.
- 600 DPI: Produces very fine detail and smooth colour gradients. Suitable for photos that viewers will examine closely, such as portrait enlargements or technical illustrations.
- 1200 DPI or higher: Reserved for professional fine-art or gallery-quality printing. Printing at this resolution takes much longer and uses significantly more ink. Only use it if you are printing on premium fine-art paper and need maximum detail.
Important: Setting DPI very high does not improve a low-resolution photo. If your photo has insufficient pixels, a high DPI setting simply makes the printer work harder without improving the result. The photo will still look blurry or pixelated because there is not enough source data to produce extra detail.
Paper Type
The Paper Type field tells the printer what kind of paper you have loaded. This setting is critical because printers adjust the amount of ink they apply, the drying time, and the paper handling based on the paper type.
Common paper types include Plain Paper, Inkjet Photo Paper, Glossy Photo Paper, Matte Photo Paper, and Thick Paper. Always match this setting to the actual paper in your printer tray. Using the wrong paper type setting, for example selecting Plain Paper when you have loaded glossy photo paper, causes the printer to apply too much or too little ink. The result is smearing, faded colours, or ink that pools on the surface instead of absorbing.
Tip: If the Paper Type field is left blank or set to Automatic, the printer uses its default profile, which may not be optimised for photo paper. Taking a moment to set this correctly produces noticeably better colour accuracy and print longevity.
Tray
The Tray dropdown lets you specify which paper tray the printer should draw paper from. Most home printers have only one tray, so this field stays on Automatic. However, office printers and multi-function printers (MFPs) often have two or more trays loaded with different paper sizes or types.
For example, an office printer might have Tray 1 loaded with A4 plain paper and Tray 2 loaded with A3 paper for larger documents. Selecting the correct tray ensures the printer uses the right paper for your job without you having to manually swap paper in and out.
Tip: If you regularly print photos on a dedicated photo paper tray, set the Tray field to that specific tray each time to avoid accidentally printing on plain paper. Leave it on Automatic if your printer has only one input source.
Section 6: Output
The Output section contains one powerful option that controls how ImagePrint prepares the final print data before sending it to the printer.

Print as Image
When you check the Print as Image checkbox, ImagePrint first converts the entire page into a single flat bitmap image and then sends that image to the printer. Normally, ImagePrint sends a combination of vector graphics and raster images directly to the printer driver, which handles the final rendering.
Print as Image exists as a troubleshooting tool. Certain older or low-quality printer drivers struggle with complex layouts that include transparency, semi-transparent layers, rotated images, or overlapping elements. In these cases, the printed result might show missing elements, garbled text, or images that look correct on screen but print incorrectly on paper.
Enabling Print as Image forces the printer to receive a single, pre-rendered picture. Because this is the most basic type of print command, virtually every printer driver supports it.
Important: There is a trade-off when using Print as Image. Very large documents, such as a poster that spans multiple A4 pages, may lose some sharpness because the in-memory bitmap has a maximum resolution limit. For small photos on A4 or Letter paper at 300 or 600 DPI, however, you will not notice any quality difference. Also, text in your document becomes pixels instead of crisp vector shapes, which can look slightly softer when viewed up close. Only enable Print as Image when you are experiencing printing problems.
Section 7: The Live Preview Panel
The large panel on the right side of the Print dialog shows a live preview of exactly how your document will look when printed. As you change any setting on the left, the preview updates automatically to reflect your choices.
Navigating the Preview
You can scroll through multi-page documents using the vertical and horizontal scrollbars, or by clicking the left and right arrow buttons below the preview panel. The left arrow navigates to the previous page and the right arrow navigates to the next page. To jump directly to a specific page, type the page number into the page index field next to the arrows.
For finer navigation, hold down the mouse wheel button and drag to pan across the page without using the scrollbars. A small hand cursor appears to indicate that panning is active.
Zoom Level
The zoom dropdown in the bottom-right corner of the preview panel lets you specify how large the preview appears. You can type a custom percentage, select a preset zoom level from the dropdown, or click the plus (+) and minus (-) buttons to zoom in or out incrementally. Selecting Fit to Width automatically scales the preview to fill the available horizontal space in the panel.
Unit Dropdown
The Unit dropdown, located above the preview panel, lets you switch between Inches, Centimeters, Millimeters, Points, and Pixels. Changing the unit affects how all size values are displayed throughout the Print dialog, including the Content label and the paper size fields. If you select Pixels, ImagePrint calculates the size based on the DPI value set in the Quality field in the Paper section.
Tip: For photo printing, Inches or Centimeters are the most practical units because they correspond directly to the physical size of the printed result.
Toolbar Buttons Above the Preview
The toolbar above the preview panel contains several additional options that affect what you see in the preview.
![]() Show Page Numbers: Displays a small page number in the upper-left corner of each page in the preview. This makes it easy to identify specific pages when setting a custom print range.
Show Page Numbers: Displays a small page number in the upper-left corner of each page in the preview. This makes it easy to identify specific pages when setting a custom print range.
![]() Show Page Margins: Displays the page margins as dotted lines overlaid on the preview. Margins cannot be changed from within the Print dialog; you must adjust them in the Page Setup dialog before opening Print.
Show Page Margins: Displays the page margins as dotted lines overlaid on the preview. Margins cannot be changed from within the Print dialog; you must adjust them in the Page Setup dialog before opening Print.
![]() Show Print Area: Highlights areas outside the printable region with a hatched pattern. Any content placed in these areas will not appear in the final printout.
Show Print Area: Highlights areas outside the printable region with a hatched pattern. Any content placed in these areas will not appear in the final printout.
![]() Auto-refresh Preview: When checked, the preview regenerates automatically every time you change a setting. Unchecking this button stops the automatic refresh, which speeds up the dialog when your document has many pages. You can refresh manually by pressing F5 or clicking the
Auto-refresh Preview: When checked, the preview regenerates automatically every time you change a setting. Unchecking this button stops the automatic refresh, which speeds up the dialog when your document has many pages. You can refresh manually by pressing F5 or clicking the ![]() Refresh Preview button.
Refresh Preview button.
Tip: The preview always displays a low-quality render to keep things fast. Therefore, never judge the final print quality by looking at the preview. The preview is for checking composition, layout, and page arrangement only. At high zoom levels, the preview will always look slightly blurry.
Section 8: Saving Your Settings and Printing
Once you have configured all the settings to your satisfaction, you have three options at the bottom of the Print dialog.
Print: Sends the print job to the selected printer immediately. ImagePrint also saves all the current dialog settings to memory.
Apply: Saves all current settings to memory without printing. This is useful when you want to keep your configuration for later but are not yet ready to print. After clicking Apply, you can safely close the dialog with the Cancel button or the X in the top-right corner.
Cancel: Closes the dialog and discards any unsaved changes to the print settings.
Importantly, ImagePrint saves your print settings together with each document file. Therefore, the next time you open the same ImagePrint document and click ![]() Print, all your previous settings reappear in the dialog automatically. This saves time when you regularly print the same type of document.
Print, all your previous settings reappear in the dialog automatically. This saves time when you regularly print the same type of document.
If you want to undo a change to the print settings after printing or applying, press Ctrl+Z (![]() Undo) on your keyboard. ImagePrint restores the previous print settings.
Undo) on your keyboard. ImagePrint restores the previous print settings.
Quick Reference: Common Beginner Mistakes to Avoid
- Paper size mismatch: Always match the Paper Size in the Print dialog to the actual paper loaded in your printer tray, and the Page size that is specified in the
 Page Setup dialog.
 - Copies left too high: Check the Copies field every time you print to avoid wasting paper on duplicate prints.
- Wrong paper type: Set the Paper Type field to match the paper you are actually using, especially for glossy photo paper.
- Scale not at 100%: Leave Scale at 100% for final prints and resize photos on the canvas instead.
- Printer offline: Check the Status field before clicking Print and make sure it says Ready.
- Low DPI for detailed photos: Use 300 DPI or higher for photos you plan to view at close range or display framed on a wall.
- Mirror enabled by accident: Always check that the Flip Horizontally and Flip Vertically checkboxes are unchecked unless you intentionally need a mirrored print.
Conclusion
The ImagePrint Print dialog puts a powerful set of controls at your fingertips. By understanding every field, from the printer destination and paper size to the DPI quality and the Print as Image troubleshooting option, you gain full control over your home photo printing results. Furthermore, the live preview panel lets you verify the outcome before a single drop of ink hits the paper.
As a beginner, start with the basics: select the correct printer, match the paper size, choose the right paper type, and set DPI to 300. Then use the live preview to confirm the layout looks right. Over time, you will discover which additional settings, such as Best Fit for paper efficiency or Mirror for T-shirt transfers, add real value to your specific printing projects.
With practice, the ImagePrint Print dialog becomes a fast and intuitive tool that helps you produce beautiful, professional-quality photos from the comfort of your home.