Have you ever looked at a digital photo on your phone and wished you could hold it in your hands? Printing photos at home is one of the most rewarding things you can do with your memories. However, many beginners find that their printed photos look nothing like what they see on screen — the colors are off, the image is blurry, or the paper feels wrong. The good news is that with the right knowledge, you can produce stunning, professional-quality prints right from your home.
- 1. Always Use the Right Paper for the Job
- 2. Always Print at the Correct Resolution
- 3. Calibrate Your Colors for Accurate Print Results
- 4. Maintain Your Printer for Consistent Quality
- 5. Get Your Print Layout and Sizing Right Every Time
- Bonus Tip: The Right Software Makes All the Difference
- Quick Reference: 5 Things to Remember
1. Always Use the Right Paper for the Job
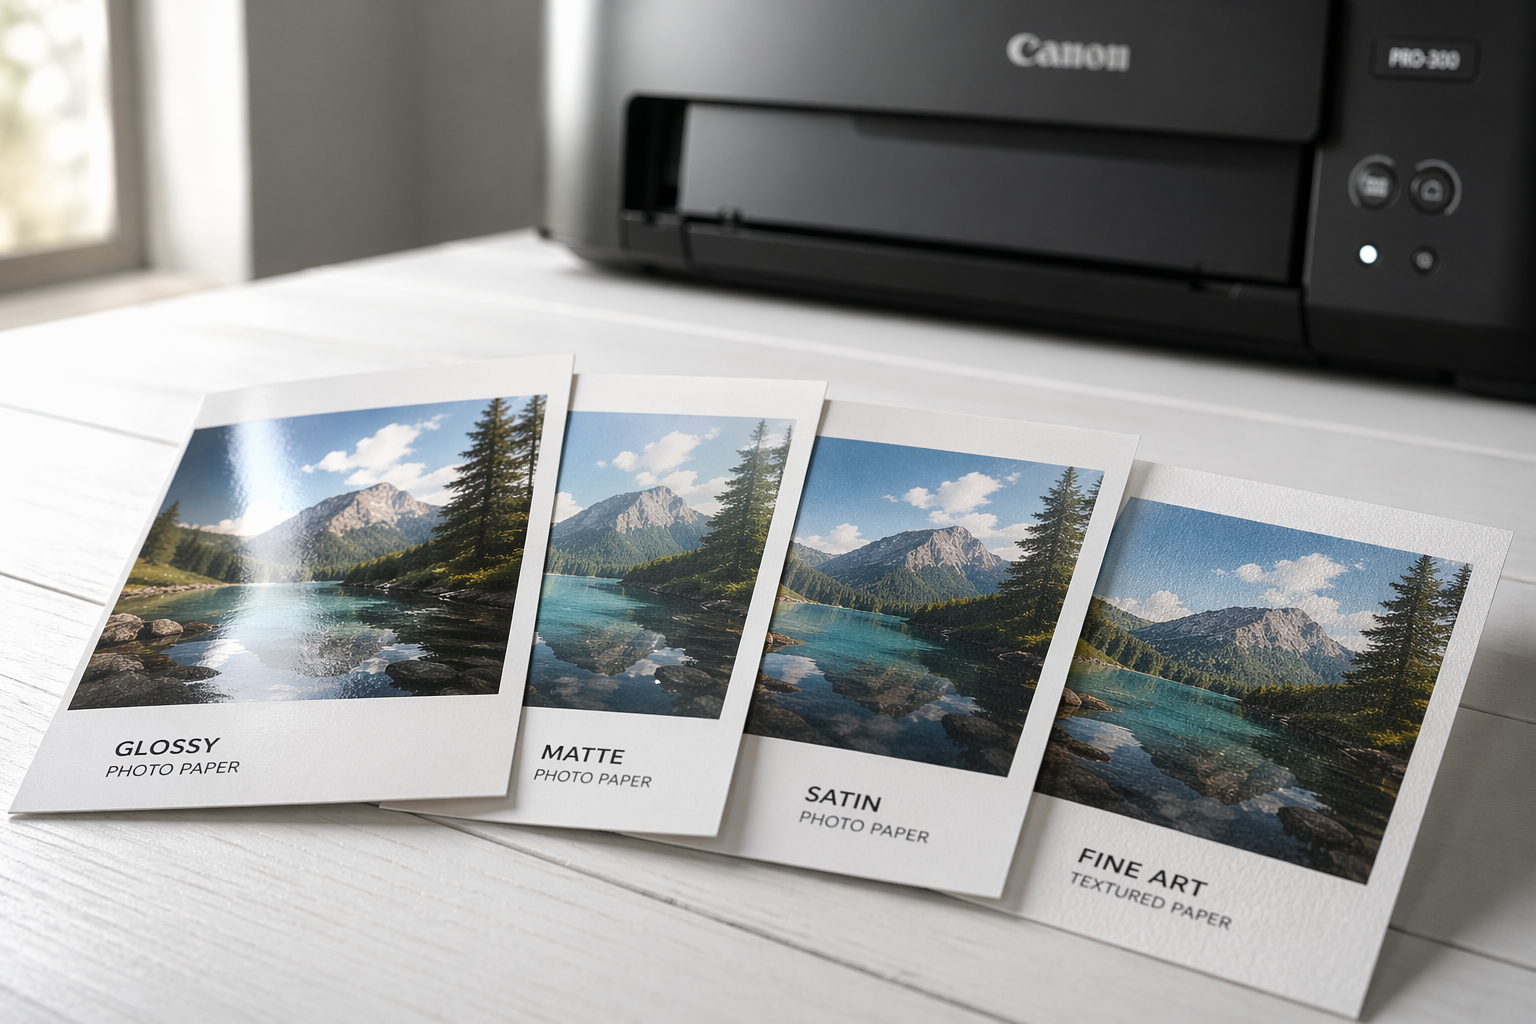
The single most overlooked factor in home photo printing is paper selection. Most beginners simply load whatever paper is already in the printer tray, and then wonder why their photos look dull or washed out. However, the paper you choose directly determines the sharpness, color accuracy, and longevity of your printed image. Therefore, understanding paper types is the first and most important step.

Understanding Photo Paper Types
Photo papers come in several distinct finishes, and each one serves a different purpose:
- Glossy paper — Produces vivid, high-contrast images with bright colors. It is ideal for portraits, vacation shots, and any photo where you want colors to pop. However, glossy paper is prone to fingerprints and glare.
- Matte paper — Delivers a soft, non-reflective finish. It suits black-and-white photography, fine art prints, and images displayed under direct lighting. Additionally, matte paper is much easier to write on.
- Satin/Luster paper — Offers a balance between glossy and matte, making it a versatile choice for everyday photo printing. Many professional photographers prefer satin for its natural look.
- Heavyweight/Fine Art paper — Thick, textured papers designed for archival-quality prints. They are perfect for large prints, art reproductions, and photos you want to last for decades.
As a general rule, always match the paper finish to your printer’s ink type. Inkjet printers perform best with papers specifically designed for inkjet printing, while laser printers require laser-compatible photo paper. Using the wrong paper can cause ink smearing, poor absorption, or even printer damage.
2. Always Print at the Correct Resolution
Resolution is one of the most misunderstood concepts in home photo printing, yet it is absolutely critical for sharp, clear results. Many beginners print images straight from social media or messaging apps, not realizing that these platforms heavily compress images and strip away the fine detail needed for high-quality prints. The result is a blurry, pixelated photo that looks great on screen but disappointing in print.

What Is DPI and Why Does It Matter?
DPI stands for Dots Per Inch. It refers to the number of ink dots a printer places within one inch of paper. The higher the DPI, the more detail your print contains. For photographic prints, you should always aim for a minimum of 300 DPI. Consequently, before you send any image to print, you need to check its pixel dimensions.
Here is a quick reference guide for print sizes and the minimum pixel dimensions you need at 300 DPI:
- 4 x 6 inch print — requires at least 1200 x 1800 pixels
- 5 x 7 inch print — requires at least 1500 x 2100 pixels
- 8 x 10 inch print — requires at least 2400 x 3000 pixels
- 11 x 14 inch print — requires at least 3300 x 4200 pixels
- 16 x 20 inch print — requires at least 4800 x 6000 pixels
Furthermore, it is important to understand that enlarging a low-resolution image does not add pixels — it simply stretches existing ones, making the photo look worse. Therefore, always start with the highest resolution version of your image available.
Tip: Always save original photos from your camera or phone at maximum resolution. Avoid sending photos through WhatsApp or Instagram before printing — these platforms compress images significantly, reducing print quality.
3. Calibrate Your Colors for Accurate Print Results
One of the most frustrating experiences for beginner photo printers is discovering that the colors in their printed photo look completely different from what appeared on screen. The vibrant sunset you saw on your monitor comes out dull and orange on paper, or the soft skin tones in your portrait look oddly green. This problem is extremely common, and it occurs because of a mismatch between your screen’s color display and your printer’s output.

Why Your Screen and Printer Show Different Colors
Your monitor displays colors using light (an additive RGB color model), while your printer reproduces colors using ink on paper (a subtractive CMYK color model). These two systems work very differently, and without proper color management, they will never produce identical results. Fortunately, understanding a few key concepts lets you bridge this gap effectively.
How to Achieve Accurate Color Output
First, calibrate your monitor using a hardware colorimeter or a free online tool. A good free and open source tool for monitor calibration is DisplayCAL. For an introduction to monitor calibration and DisplayCAL, please check out How to Calibrate Your Monitor.
A calibrated screen ensures that the colors you see while editing are as accurate as possible. Second, use ICC color profiles for your specific paper and printer combination. ICC profiles are small data files that tell your printer exactly how to translate digital colors into ink. Many paper manufacturers provide free ICC profiles for download on their websites.
Additionally, always print in the correct color space. Most digital photos use the sRGB color space, which is compatible with the majority of home printers. If your editing software works in RGB, convert your files to sRGB before printing to avoid unexpected color shifts.
4. Maintain Your Printer for Consistent Quality
Even the most expensive printer will produce poor-quality photos if it is not properly maintained. Clogged print heads, dried ink nozzles, and misaligned cartridges are among the most common causes of streaky, faded, or color-shifted prints. Consequently, regular printer maintenance is not optional — it is essential for anyone who wants to print photos consistently at home.

Essential Printer Maintenance Tasks
Cleaning the print heads is the most important maintenance task. Over time, ink dries inside the tiny nozzles of your print heads, causing gaps or streaks in your prints. Most modern inkjet printers include a built-in nozzle cleaning function that you can access through the printer’s settings menu or your computer’s printer software. Running this cleaning cycle every few weeks prevents buildup and maintains consistent ink flow.
Furthermore, aligning your print heads is equally important, especially after replacing ink cartridges. Misaligned print heads cause colors to appear slightly offset from each other, resulting in a blurry or double-image effect. Fortunately, most printers automate the alignment process and guide you through it step by step.
In addition to print head care, keep the following maintenance habits in mind:
- Replace ink cartridges promptly when low — printing with nearly empty cartridges damages print heads and produces uneven results.
- Store unused photo paper in its sealed packaging to prevent moisture absorption and warping.
- Keep your printer covered when not in use to prevent dust from settling on internal components.
- Run a test print page at least once every two weeks if you do not print regularly, as this prevents ink from drying in the nozzles.
Tip: Never run multiple nozzle cleaning cycles back-to-back. Each cycle uses a significant amount of ink. If one cycle does not solve the problem, run a second cycle and then wait 12 hours to let the loosened ink settle before printing again.
5. Get Your Print Layout and Sizing Right Every Time
Even when you have the perfect photo, the right paper, and a well-maintained printer, a poor layout can still ruin the final result. Incorrect sizing, unwanted cropping, and unbalanced margins are among the most common beginner mistakes. Moreover, understanding how to arrange your images on the page — especially when printing multiple photos per sheet — is a skill that saves both time and money.

Understanding Aspect Ratios and Cropping
Every photo has an aspect ratio — the proportional relationship between its width and height. For example, most smartphone cameras capture photos in a 4:3 ratio, while DSLR cameras typically shoot in a 3:2 ratio. Standard photo print sizes, however, do not always match these ratios. Therefore, when you resize a 4:3 photo to fit a 4×6 inch (3:2 ratio) print, part of your image gets cropped.
To avoid unintended cropping, always preview your photo layout before printing. Check that the important subject of your image — a face, a key detail, a focal point — is not being cut off by the print borders. Adjust the crop manually if needed, or choose a print size that better matches your photo’s natural proportions.
Printing Multiple Photos Per Sheet
Printing multiple photos on a single sheet of paper is an excellent way to save paper and ink. For instance, you can fit two 4×6 prints on a single letter-sized sheet, or arrange a contact sheet of 16 small thumbnails for easy reference. However, proper spacing and alignment between images are essential to avoid awkward cuts when you trim the sheet.
Additionally, consider the print border (or bleed area) of your printer. Most home printers cannot print right to the edge of the paper — they leave a small unprintable margin around the border. Knowing your printer’s exact bleed margin prevents you from accidentally placing important photo content in this area.
This is where ImagePrint truly shines. Its intuitive Drag-and-Drop application lets you arrange single or multiple photos on any page size with pixel-perfect precision. It offers pre-built layout templates for the most popular print sizes — 4×6, 5×7, 8×10, wallet prints, and more. As a result, what you see on screen is exactly what comes out of your printer.
Bonus Tip: The Right Software Makes All the Difference
All five tips above become significantly easier when you use dedicated photo printing software. General-purpose programs like Microsoft Word or Windows Photos are not designed for precision photo printing — they lack color management, print head control, and layout flexibility. Consequently, many beginners blame their printer or paper when the real issue is the software they are using.
ImagePrint is purpose-built for home photo printing. It brings together all five elements of this guide into one clean, beginner-friendly interface. Furthermore, ImagePrint integrates directly with Windows’ printing subsystem, giving you access to advanced printer settings that are hidden or inaccessible in other apps.

Whether you are printing cherished family memories, building a home photo gallery wall, or creating personalized gifts for loved ones, ImagePrint gives you the tools to do it beautifully — every single time.
Quick Reference: 5 Things to Remember
| # | What to Remember | Quick Action |
| 1 | Use the Right Paper | Match paper finish to your ink type and subject |
| 2 | Print at Correct Resolution | Always use 300 DPI minimum for photo prints |
| 3 | Calibrate Your Colors | Use ICC profiles and soft-proof before printing |
| 4 | Maintain Your Printer | Clean nozzles and align heads regularly |
| 5 | Get Layouts Right | Preview crops and layouts before every print job |