
If you have ever tried to print a photo at home and ended up with a blurry, cropped, or oddly sized result, you are definitely not alone. Understanding print sizes is one of the most important steps toward getting beautiful prints right from your own printer. In this guide, we explain the most common photo print sizes, tell you exactly when to use each one, and show you how to set them up easily in ImagePrint — a powerful yet beginner-friendly Windows application designed for printing photos at home.
Whether you want to print wallet-sized portraits, classic 4×6 snapshots, wall-worthy 8×10 prints, or even large multi-page posters, this guide covers everything you need to know about print sizes. Let’s get started.
Why Print Sizes Matter
Before diving into specific print sizes, it is important to understand why they matter in the first place. When you print a photo at home, the size of the printed image must match the paper loaded in your printer. If the sizes do not match, you will get unwanted white borders, cropped edges, or a distorted image.
Additionally, print sizes are always measured in inches or centimeters, not in pixels. This is because printers work at a specific resolution — usually 300 DPI (Dots Per Inch) for quality printing. A photo that looks large on screen can actually print quite small if its resolution is low. Therefore, always think in inches or centimeters when planning your prints, not in pixels.
ImagePrint handles this seamlessly. The application always works in physical units like inches and centimeters, so what you see on your screen matches exactly what comes out of your printer.
Tip: Always set your page size in ImagePrint before you start placing photos. Go to the toolbar and click the ![]() Page Setup button to choose your paper size. Make sure it matches the paper you have loaded in your printer.
Page Setup button to choose your paper size. Make sure it matches the paper you have loaded in your printer.
The Most Common Photo Print Sizes
There are several standard print sizes that most home printers support. Furthermore, these sizes are widely used by photographers, families, and hobbyists around the world. Below, we walk through the most popular ones and explain when to use each.
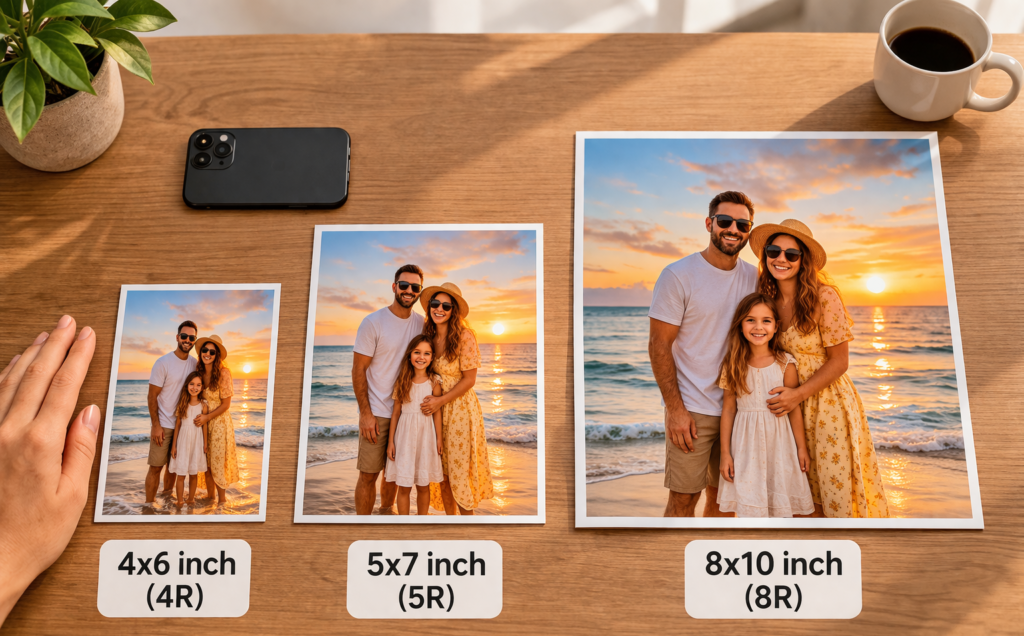
Standard photo (4R): The 4×6 inch print (10.16 x 15.24 cm) is by far the most popular home photo print size. It matches the standard aspect ratio of most digital cameras and smartphones, which means your photos fit perfectly without any cropping. Use this size for everyday snapshots, holiday photos, family portraits, and photos you want to keep in an album or send to friends. Because it is small and economical, this is also the best choice for printing many photos in one go.
Simple frame (5R): The 5×7 inch print (12.7 x 17.78 cm) is a step up from the classic 4×6 and looks great in a simple frame on a desk or shelf. Use this size when you want a slightly larger print for a specific photo — like a birthday portrait or a school photo. It strikes a perfect balance between cost and impact.
Framed wall photo (8R): The 8×10 inch print (20.32 x 25.4 cm) is considered the standard for framed wall photos. Use this size when you want to hang a photo in your home or give it as a meaningful gift. This size is also popular for professional headshots and portraits. Keep in mind that most smartphone photos have a 4:3 ratio, so you may need to crop them slightly to fit an 8×10 frame.
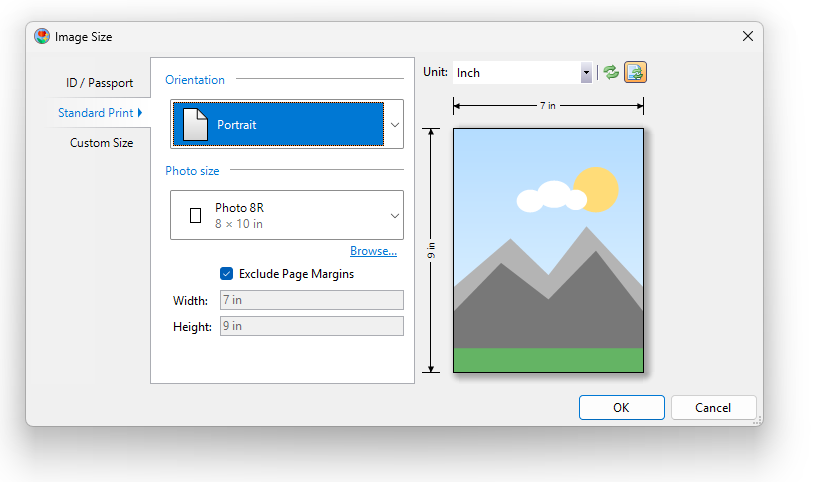
Tip: When printing 8×10 photos, use the Crop Image tool in ImagePrint to adjust the framing before printing. Click on the image, then press the ![]() Crop Image button on the context toolbar. The 8×10 inch size is also available as a standard size in the Image size dialog. Select one or more photos, and press the
Crop Image button on the context toolbar. The 8×10 inch size is also available as a standard size in the Image size dialog. Select one or more photos, and press the ![]() Resize button to open the dialog. The go to the Standard Print tab, and select 8×10 from the Photo size dropdown. Make sure that Excude Page Margins is unchecked.
Resize button to open the dialog. The go to the Standard Print tab, and select 8×10 from the Photo size dropdown. Make sure that Excude Page Margins is unchecked.
Larger Print Sizes for Wall Art
If you want to make a real impression, larger print sizes turn your photos into stunning wall art. Consequently, they require higher-resolution images to look sharp when printed big.
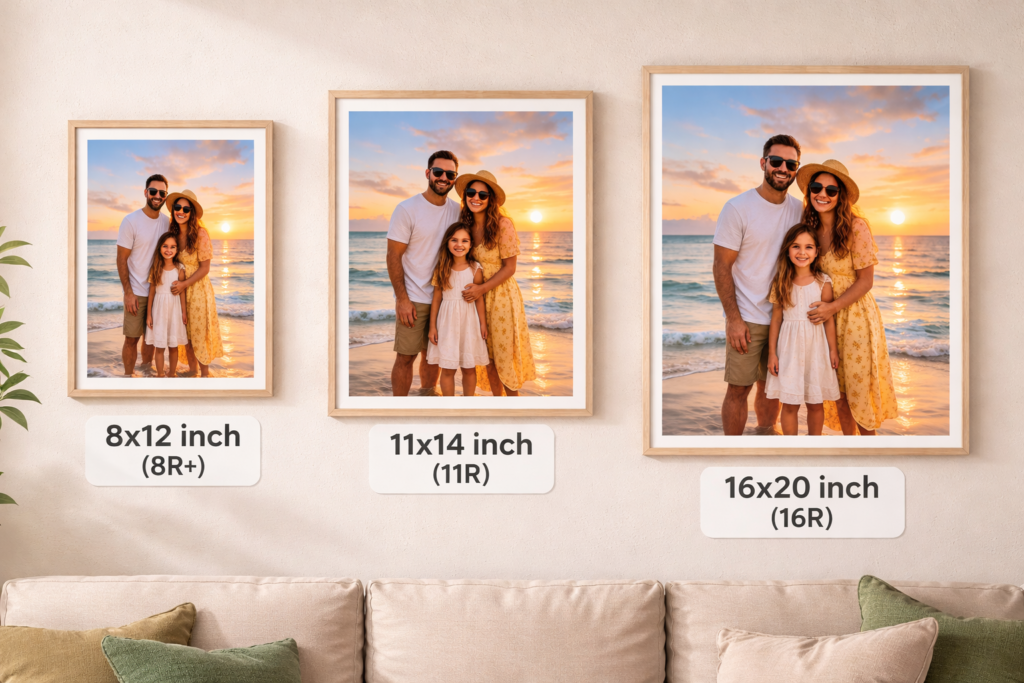
Wall art (8R+): The 8×12 inch print (20.32 x 30.48 cm) perfectly matches the 2:3 aspect ratio of most DSLR cameras and many modern smartphones. This means your photos print without any cropping at all. Use this size for landscape photography, travel photos, and artistic portraits that deserve more room to breathe on the wall.
Gallery (11R): The 11×14 inch print (27.94 x 35.56 cm) is a professional gallery-style size that commands attention. Use this size for stunning landscape shots, group family photos, or any image that tells a story. It fills a medium-sized frame beautifully and creates a focal point in any room.
Large wall art(16R): The 16×20 inch print (40.64 x 50.8 cm) is a large format that genuinely transforms a room. Use this size for your absolute best photos — the ones that make people stop and look. Because it is large, your image needs to be high resolution (ideally 2400 pixels wide or more) to avoid looking blurry or pixelated when printed.
Tip: Before printing large photos in ImagePrint, use the ![]() Resize button on the image’s context toolbar to check that your photo has enough pixels. If the image is too small for the chosen print size, the result will look blurry.
Resize button on the image’s context toolbar to check that your photo has enough pixels. If the image is too small for the chosen print size, the result will look blurry.
Standard Paper Sizes: A4, Letter, and A3
In addition to dedicated photo sizes, many people print photos on standard office paper sizes. These are extremely convenient because most home printers already support them.
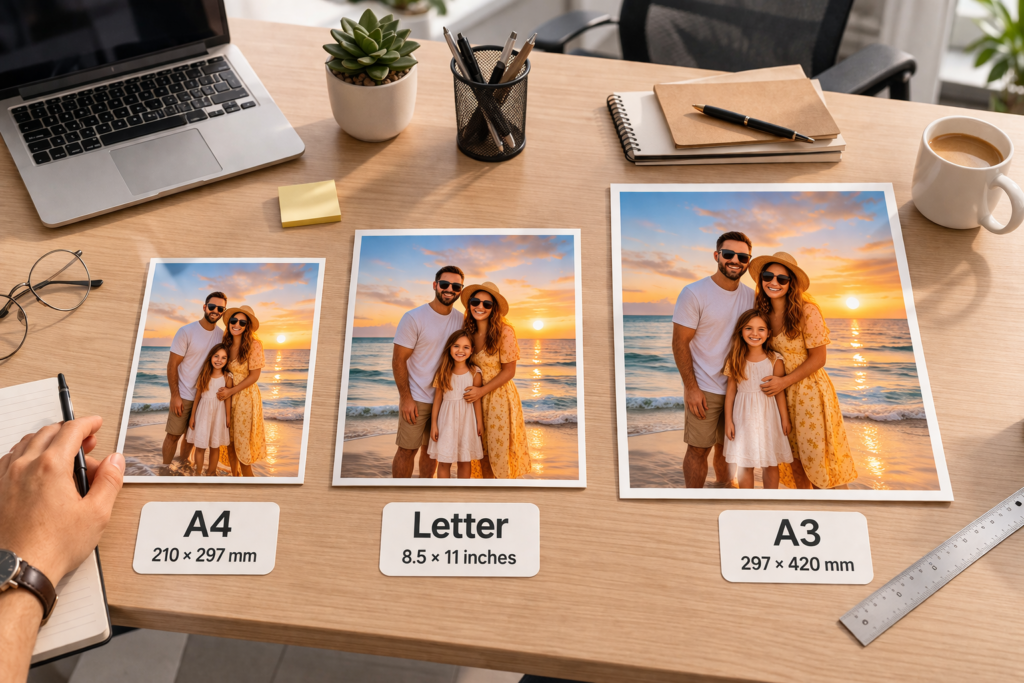
A4 (210 x 297 mm or 8.27 x 11.69 inches) is the standard paper size used throughout Europe, Australia, and most of the world. In ImagePrint, A4 is often the default page size for users outside the US. It is ideal for printing multiple smaller photos arranged in a grid, printing a single 6×8 inch (6R) photo with a small margin, or creating photo cards and invitations.
Letter (8.5 x 11 inches or 215.9 x 279.4 mm) is the standard paper size in the United States and Canada. ImagePrint automatically sets the default page size to Letter for users in these regions. Letter paper suits the same uses as A4 — multiple small prints, individual photos, and creative layouts.
A3 (297 x 420 mm or 11.69 x 16.54 inches) is twice the size of A4 and allows you to print noticeably larger photos. Use A3 if your printer supports it and you want to create impressive, larger-than-life wall prints without going all the way to a multi-page poster.
Tip: In ImagePrint, you select your paper size by clicking ![]() Page Setup on the toolbar, then using the Browse… button in the Page Size section to find the exact size you need. You can type the name — such as “A4”, “Letter”, or “A3” — into the filter box to find it instantly.
Page Setup on the toolbar, then using the Browse… button in the Page Size section to find the exact size you need. You can type the name — such as “A4”, “Letter”, or “A3” — into the filter box to find it instantly.
How to Set Print Sizes in ImagePrint Step by Step
Setting the correct print size in ImagePrint is straightforward. First, open the application and click the ![]() Page Setup button on the main toolbar, or go to Layout >
Page Setup button on the main toolbar, or go to Layout > ![]() Page Setup in the menu bar. Alternatively, press Ctrl+Shift+P on your keyboard.
Page Setup in the menu bar. Alternatively, press Ctrl+Shift+P on your keyboard.

In the Page Setup dialog, locate the Page size section and click the Browse… button. Type the name of the size you need — for example “4 x 6 in” or “A4” — into the filter text box. Click the size to select it, then click OK to confirm. Your document page will now resize to match the paper you plan to print on.
Next, set your margins. For most home printers, a margin of 0.5 inches on all sides is a safe choice that prevents the printer from cutting off the edges of your photo. If you own a printer that supports borderless printing, you can set all margins to zero for a full-bleed print that reaches every edge of the paper.
Finally, set the orientation. Choose Portrait for tall, vertical photos and Landscape for wide, horizontal images. Changing the orientation in ImagePrint automatically swaps the width and height, so your layout always looks right.
Tip: In ImagePrint you can find over 150 standard paper sizes, including all common photo sizes like 3×5, 4×6, 5×7, 6×8, 8×10, 8×12, 11×14, and 16×20 inches, as well as A4, A3, Letter, and many more. Use the Browse button to search them quickly.
Printing Multiple Photos on One Page
One of the most useful features in ImagePrint is the ability to print many photos on a single sheet of paper. This saves both paper and ink, and produces professional-looking results.
To do this, use the Photo Strip feature. In the left toolbox, click the ![]() Photo Strip button to add a container shape to your document. Then move it to the top-left corner of the page within the white area. Next, click the
Photo Strip button to add a container shape to your document. Then move it to the top-left corner of the page within the white area. Next, click the ![]() Add images button on the context toolbar, or simply double-click the Photo Strip to browse for your photos. ImagePrint arranges them automatically in a grid.
Add images button on the context toolbar, or simply double-click the Photo Strip to browse for your photos. ImagePrint arranges them automatically in a grid.
You can control the grid layout from the Properties panel on the right side of the screen. For example, setting the grid to 2 columns and 3 rows prints six 4×6 photos on a single A4 or Letter sheet. The spacing between photos can also be adjusted — set it to zero for photos that touch edge to edge, or add a small spacing to create a clean white border between each print.
Alternatively, use the ![]() Flow Layout container when you need precise control over each photo’s size. Unlike the Photo Strip, Flow Layout lets you set an exact size for every image. Click
Flow Layout container when you need precise control over each photo’s size. Unlike the Photo Strip, Flow Layout lets you set an exact size for every image. Click ![]() Resize all images on the context toolbar to open the Image Size dialog, then type your desired dimensions in inches or centimeters.
Resize all images on the context toolbar to open the Image Size dialog, then type your desired dimensions in inches or centimeters.
How to Print Poster-Sized Photos Across Multiple Pages
ImagePrint excels at stretching a single large photo across multiple pages to create a poster. This is a fantastic, budget-friendly alternative to professional printing services.
Start by setting your page size to the paper in your printer — usually A4 or Letter. Make sure the Auto size option is enabled in the Page Setup dialog so that ImagePrint can automatically add new pages as your poster grows. Then add your photo by double-clicking on the page and dragging it to the upper-left corner within the white area.
To resize the photo into a poster, click the ![]() Resize button on the image’s context toolbar. Select Standard Print and choose your target size, such as A3 or A2. Ensure Exclude Page Margins is checked so the image fits the printable area precisely. ImagePrint then divides the large image across as many pages as needed.
Resize button on the image’s context toolbar. Select Standard Print and choose your target size, such as A3 or A2. Ensure Exclude Page Margins is checked so the image fits the printable area precisely. ImagePrint then divides the large image across as many pages as needed.
When you print the poster, use the ![]() Print dialog (Ctrl+P) to verify the preview. Each page will show one section of the poster. After printing, simply trim the edges and tape the pages together
Print dialog (Ctrl+P) to verify the preview. Each page will show one section of the poster. After printing, simply trim the edges and tape the pages together
Tip: Use the ![]() Show Page Margins button on the main toolbar before printing your poster. This shows dotted lines where the printer’s physical margins are, so you know exactly where to trim for a seamless join between pages.
Show Page Margins button on the main toolbar before printing your poster. This shows dotted lines where the printer’s physical margins are, so you know exactly where to trim for a seamless join between pages.
Printing Passport and ID Photos at Exact Print Sizes
Printing passport and ID photos at home is one of the most practical uses of ImagePrint. The application includes built-in support for over 400 standard document photo sizes from countries and regions around the world.
To print passport photos, click the ![]() Repeat Image button in the left toolbox to add a Repeat Image container to your page. Move it to the top-left corner within the white printable area. Then add your portrait photo to the container.
Repeat Image button in the left toolbox to add a Repeat Image container to your page. Move it to the top-left corner within the white printable area. Then add your portrait photo to the container.
Next, click the ![]() Resize button on the image’s context toolbar and select the ID / Passport tab. Choose your country from the list and select the document type — for example, United States – Passport (2 x 2 in). ImagePrint resizes and crops your photo to the exact required dimensions automatically.
Resize button on the image’s context toolbar and select the ID / Passport tab. Choose your country from the list and select the document type — for example, United States – Passport (2 x 2 in). ImagePrint resizes and crops your photo to the exact required dimensions automatically.
In the Properties panel, set the Grid to 2 columns and 2 rows (or 4 x 4 for a full sheet) and set horizontal and vertical Alignment to Stretch. Enable Page Break and set Spacing to zero. This creates a neat grid of identical passport photos on your page, ready to print and cut.
To make cutting easier, enable the Bleed and Trim Marks options in the Properties panel. Bleed adds a small extra border around each photo so that cutting slightly off-center still produces clean edges. Trim Marks add small lines showing exactly where to cut. The industry standard bleed is 1/8 inch (approximately 3 mm) for photo printing.
Tip: For precise cutting of passport photos, consider investing in a photo punch cutter. These cutters come in standard sizes matching common passport dimensions — such as 2×2 inches for US passports or 35×45 mm for most European passports — and produce perfectly straight, professional-looking borders every time.
Choosing the Right Resolution for Your Print Size
Understanding resolution is essential when printing at different print sizes. The rule is simple: the larger the print, the more pixels your image needs to look sharp.
As a general guideline, aim for 300 DPI at your final print size. This means a 4×6 inch print needs at least 1200 x 1800 pixels, a 5×7 inch print needs 1500 x 2100 pixels, and an 8×10 inch print needs 2400 x 3000 pixels. For a 16×20 inch print, you need at least 4800 x 6000 pixels for a sharp result.
In ImagePrint, the default document resolution is 300 DPI, which is the professional standard for photo printing. For poster printing, 150 DPI is sometimes acceptable because viewers stand further away from large prints, so slight softness becomes less noticeable.
When you open the ![]() Print dialog (Ctrl+P), the Quality field shows the printer’s DPI setting. For best results, set this to at least 1200 DPI for photo prints. Setting it to 600 DPI is fine for quick drafts and test prints that help you check composition and color before committing to expensive photo paper.
Print dialog (Ctrl+P), the Quality field shows the printer’s DPI setting. For best results, set this to at least 1200 DPI for photo prints. Setting it to 600 DPI is fine for quick drafts and test prints that help you check composition and color before committing to expensive photo paper.
Final Tips for Perfect Prints at Any Size
Getting beautiful prints at home comes down to a few simple habits. First, always match your ImagePrint page size to the paper loaded in your printer. A mismatch is the most common cause of printing problems for beginners.
Second, always print a test page on plain paper before using expensive photo paper. Colors on screen can look different from printed output because monitors display light while printers reflect it. A test print lets you catch brightness, color, and cropping issues at a low cost.
Third, use the ![]() Auto Correct feature in ImagePrint to quickly improve the brightness and color of your photos before printing. Select the image, click
Auto Correct feature in ImagePrint to quickly improve the brightness and color of your photos before printing. Select the image, click ![]() Auto Correct on the context toolbar, and then fine-tune with the
Auto Correct on the context toolbar, and then fine-tune with the ![]() Image Corrections sliders if needed. A small boost in contrast and saturation usually makes a big difference in printed results.
Image Corrections sliders if needed. A small boost in contrast and saturation usually makes a big difference in printed results.
Fourth, always select the correct paper type in the Print dialog. Setting it to “Photo Paper” when you are using glossy photo paper ensures the printer applies the right amount of ink and drying time, which prevents smearing and produces vivid, accurate colors.
Finally, remember that ImagePrint supports over 150 standard paper and photo print sizes, including all the common sizes covered in this guide. Use the Browse button in either the Page Setup or Print dialog to find any size quickly by typing its name or dimensions. With the right size selected and a well-composed photo, you will produce professional-looking prints from the comfort of your own home.